WordPress is the most popular content management system (CMS) in use today, powering over 810 million websites, according to colorlib. But the CMS giant’s 63.1% market share has a downside, too: its popularity makes it one of the most targeted CMSs. Make no mistake, WordPress security is robust, with a consistent flow of regular updates for bug fixes, security patches, and features. However, bad website management practices can make a WordPress website more vulnerable.
No-Code WordPress Security Tips
Even when you don’t have any technical expertise, there are a number of WordPress security best practices you can (and should) employ to protect your site, your information, and your site visitors and users.
Use a Secure WordPress Host
Actively managing your own WordPress website can be time-consuming. Not to mention the constant gnawing at your subconscious about your WordPress site’s security. Secure WordPress hosting is a shortcut to a worry-free WordPress experience. After all, the onus is on someone else to keep your WordPress website secure. Secure WordPress hosting typically includes the following features:
- Secure hosting infrastructure
- WordPress, plugin, and theme updates
- SSL certificates
- 24/7 monitoring of your site and its hosting infrastructure
- Full website backups
Of course, since we offer secure WordPress hosting, we’d be remiss not to briefly mention how we go the extra mile at Sunny HQ:
- Enterprise-grade hosting (including DDoS protection)
- Robust infrastructure-wide security
- Daily full website backups
- Daily security scans
- Free malware removal
- 24x7x365 Uptime Monitoring
- Cloudflare CDN
If you’re already hosting somewhere else and don’t want to switch hosts just yet, sign up for our WordPress maintenance service.
Regular Backups Can Boost WordPress Security
Backups typically fall into the disaster recovery/business continuity category. They may not actively contribute to WordPress security, but backups can help soften the impact of a breach. A recent backup can, for example, mitigate the effects of a ransomware attack or malware infection and protect against data loss.
The frequency with which data should be backed up is debatable. If we take a literal approach based on the purpose of backups, then you should have a backup of your website whenever changes are made to your site. ‘Changes’ can refer to a new post, a new shop order, and so on.
But if you’re running a busy website, backing up your website a few times a day becomes impractical unless you’ve got the means for real-time backups.
Instead, consider how much data you can comfortably lose in the event of a breach or disaster scenario. Can you lose a day’s worth of transaction data? What about a week’s worth of published posts? In tech jargon, this is referred to as a Recovery Point Objective or RPO. Whatever you decide you’re comfortable with should be your backup frequency.
Once you’ve decided on a backup schedule, get strategic about where you store your backups. One of the most commonly used backup strategies is the 3-2-1 Backup Strategy:
- 3 copies of your WordPress database and files
- 2 of these copies are stored on different storage media (e.g. USB flash drive and / or external hard drive and / or cloud storage)
- 1 copy is stored at an offsite location
The ‘two different storage media’ rule is used to ensure that, should one break or become unreadable, you’ll still have access to your WordPress site backup from the remaining storage device. Storing a copy of your WordPress website offsite ensures protection against natural disasters, which you may think unlikely, but data center fires do happen more often than you might think, and hosting companies can themselves become victims of ransomware attacks and lose all their data (and yours too).
Also see: What To Do When Your New WordPress Site Is Hacked
Install a WordPress Security Plugin
In addition to backups, a WordPress security plugin is your main line of defense against online attacks. They’re great, because they take care of the security nuances that’d usually require some technical expertise to achieve, such as editing your site’s .htaccess file, web server config, running and maintaining a firewall, detecting and cleaning malware, etc.

The three most popular security plugins at the moment of writing are:
- Wordfence (4 million+ active installs)
- All-In-One Security (AIOS) (1 million+ active installs)
- Sucuri Security (900k+ active installs)
When installing one of these plugins, ensure that you activate the following features:
Limit login attempts: Brute force attacks rely on trial and error, which means limiting the number of allowed login attempts further secures your WordPress website. While limiting the number of login attempts, you can select a period of time any transgressor should be locked out.
Disable file editing: The theme file editor located at Appearance > Theme File Editor can be a serious security risk in a scenario where an attacker has gained access to your site. Not only could they potentially elevate their WordPress role, but they can even gain access to your server.
Disable PHP File Execution: Disabling PHP file execution for the /uploads directory prevents files with malicious code from being executed. Such files can either be uploaded by an attacker or created by a compromised plugin. The /uploads directory should only be used for storing static content, such as media.
Enable two-factor authentication: Turn on two-factor authentication (2FA) to add an additional layer of security to your WordPress authentication security. 2FA requires entering a code, usually provided by a mobile app like Google Authenticator, in addition to the WordPress username and password. Only once the code has been confirmed can a user gain access to your WordPress website’s backend.
Prevent directory listings: As discussed in more detail below, directory listings can expose the files contained in WordPress directories to attackers, and also provide detailed insight into the structure of your WordPress installation. It can also reveal the various themes and plugins you have installed. Disabling directory listing keeps your site’s directories and files private.
Hide WordPress version: While WordPress is highly secure, the occasional vulnerability creeps into the code. Such vulnerabilities are usually addressed quickly with an update, at which point WordPress gets a new version number. Hiding your WordPress version number will make it harder for attackers to know which vulnerabilities to probe for. This is considered “security through obscurity”.
From my own personal experience, Wordfence has been a highly dependable security plugin that I’ve used on many sites – one I’d definitely recommend. However, it’s important to note that installing a security plugin alone is only one half of the equation; good security practices are necessary to ensure comprehensive WordPress security.
Also see: WordPress Security: 8 Top Plugins
Install an SSL Certificate for Your Website
Nowadays, SSL certificates come part and parcel with hosting packages. These Secure Sockets Layer certificates encrypt the information exchanged between a browser and a web server, and ensure that the data being transferred isn’t altered in any way without detection.
You can easily check whether your site has an SSL certificate enabled by looking for a padlock icon in the address bar next to your site’s URL. You’ll also note that your site’s URL is preceded by https://.

If you don’t have an SSL certificate enabled on your website, ask your hosting provider. SSL certificates range from free to premium and should be selected based on the data sent to and from your site. For example, brochure sites and blogs can make use of LetsEncypt’s free SSL certificates. However, if you store sensitive customer information such as credit card details, you may require a more comprehensive Organization Validation (OV) or Extended Validation (EV) certificate to ensure PCI DSS compliance.
Also see: Get a FREE SSL Certificate for WordPress. Really!
Keep Your Site and Plugins Updated
Outdated WordPress core, plugin, and theme versions are one of the biggest sources of WordPress security vulnerabilities. Wordfence’s Weekly Vulnerability Reports can be found in their blog, and provides a centralized and easy-to-digest view of the week’s plugin vulnerabilities. More importantly, the weekly lists of vulnerabilities should emphasize that keeping your WordPress core, plugins, and themes up to date is a no-brainer.
Luckily, WordPress contains the functionality to enable automatic updates for your WordPress core, plugins, and themes. The only drawback is that, once in a blue moon, plugin updates can break your site, which is why it’s often recommended to use a staging site to test updates and other site changes, or to sign up for a WordPress maintenance service that’ll take care of these updates for you.
How to enable auto-updates for plugins in WordPress
Once logged into your WordPress dashboard, navigate to Plugins > Installed Plugins and click on Auto-updates Disabled to view a list of plugins for which auto-update has not been turned on. Select all your plugins, and then select Enable Auto-updates from the drop-down menu. Click Apply.
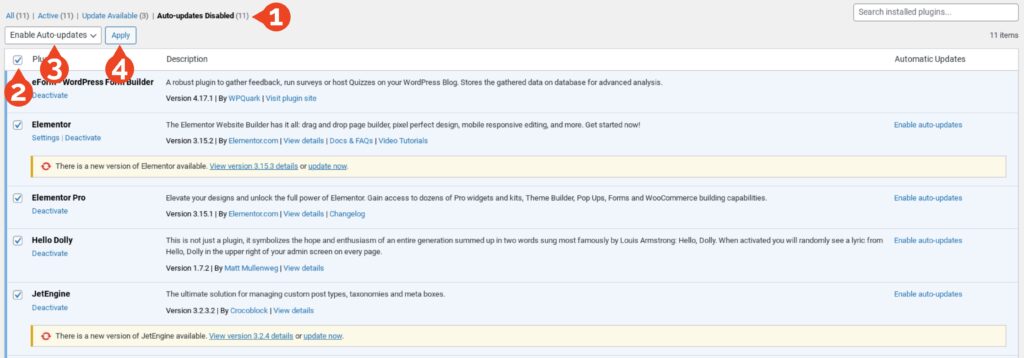
It’s worth noting that this feature may not work for all plugins; some premium plugins may require manual updating.
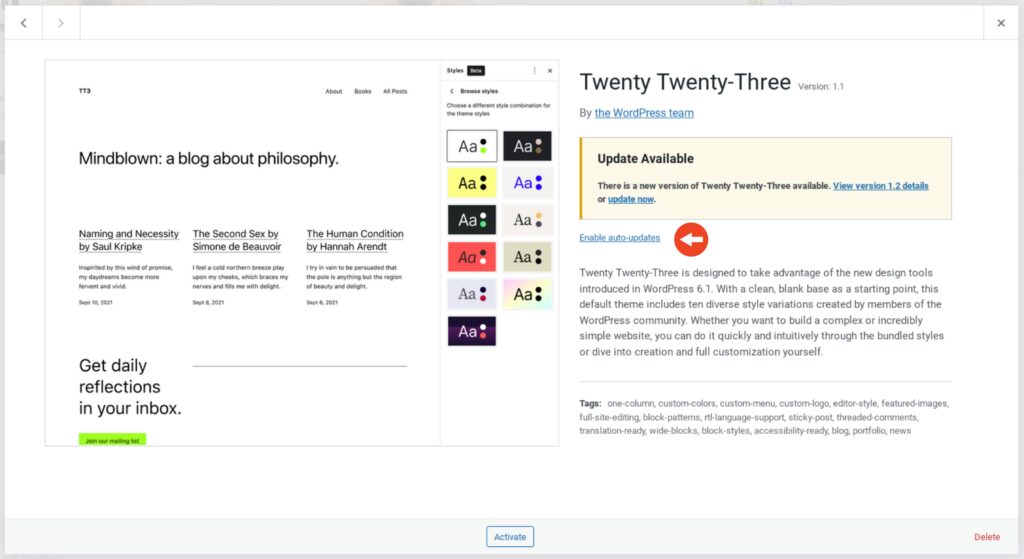
How to enable auto-updates for themes in WordPress
Once logged into your WordPress dashboard, navigate to Appearance > Themes. Click on your theme’s thumbnail to load the theme details popup. Click Enable auto-updates which is located just below the theme author.
How to enable auto-updates for WordPress core
There are two types of WordPress core updates: major and minor. Major version updates generally include new features, while minor updates are reserved for bug fixes, security updates, and maintenance. Unlike plugins and themes, minor automatic updates are enabled by default.
You can enable automatic updates for both major and minor version updates of WordPress core by navigating to Dashboard > Updates and then clicking Enable automatic updates for all new versions of WordPress.

WordPress Plugin & Theme Best Practices
Given that plugins and themes can be a significant source of potential vulnerabilities, following best practice guidelines can significantly reduce your risk of getting hacked. This includes:
Delete inactive plugins
Inactive plugins are often incorrectly assumed to be harmless. However, the reverse is often true:
- Even when a plugin is inactive, its files – which may contain vulnerabilities – still reside on the server. When files and directories aren’t properly protected, attackers could access plugin files and exploit vulnerabilities.
- Inactive plugins are often neglected during the update process. Similarly, inactive plugins could be abandoned without your knowledge, leaving potential exploits unpatched
- Inactive plugins can be activated by accident, increasing a site’s attack surface
Keep your plugin & theme footprint small
The more plugins and themes you have, the greater the attack surface of your website. An ‘attack surface’ refers to all the different points a threat actor can use to launch an attack. As such, a site with 40 plugins installed will have a bigger attack surface than a site with 5 plugins installed.
Where you may require custom functionality, consider plugins that allow you to build your own custom functionality into your WordPress website, such as Crocoblock’s JetEngine or Advanced Custom Fields. Where themes are concerned, installing a barebones theme such as Elementor’s Hello theme along with a page builder plugin (e.g. Elementor) can further reduce the number of plugins needed, and so reduce your site’s attack surface.
Maintain a list of trusted plugin & theme vendors
One of the major strengths of WordPress is also one of its weaknesses: anyone can create a WordPress plugin or theme. This introduces a variety of coding / development standards and practices into the WordPress ecosystem, which can ultimately increase the number of potential exploits. It has also created
You can increase WordPress’s security by only using plugins and themes from a list of trusted plugin authors that you yourself curate. This doesn’t mean that list should include only authors with zero previous vulnerabilities (which would be hard to find), but rather those that follow best practices (regular updates, immediate security patches where exploits have been discovered, etc.).
OpenCVE (requires free signup) can be used to search for current and historic vulnerabilities by author and plugin / theme. This can be checked against a plugin or theme’s changelog to determine how quickly the author released a patch for a particular vulnerability.
Pro tip: ‘Nulled’ plugins often contain malicious code designed to introduce vulnerabilities into your website. Always download plugins from the developer / vendor’s website.
WordPress Username and Password Security
It’s helpful to think of your WordPress username and password as two different passwords. When neither of these is available to potential attackers, it increases the difficulty of gaining access to your account via brute force methods.
Brute force attacks refer to a technique where an attacker will attempt to gain access by trying all possible combinations of usernames and passwords. But rather than spend hours typing out different username/password combinations, hackers use a small script to automate the process, which means they can theoretically try tens of thousands of combinations every hour. This script can use a dictionary of common and less common username / password combinations to try different variations until access is gained to your site.
Avoiding commonly-used usernames and passwords is therefore crucial for WordPress security.
Some usernames to avoid include:
- admin
- admin1
- adm
- manager
- root
- user
- test
- sysadmin
- qwerty
- hostname
- support
At the same time, it’s important to ensure that all passwords on your WordPress website are:
- At least 12 characters in length
- Contain uppercase letters, lowercase letters, numbers, and special characters (such as @,$.#%&^ etc.)
- Made up of unique words that are not products, brand names, or names, and do not appear in dictionaries
You can check whether your chosen password has been exposed in a data breach at Have I Been Pwned. You can check whether your email address and associated password have been exposed in a data breach at Scattered Secrets (requires free signup).
WordPress Roles
Where email addresses, usernames, and passwords typically touch on WordPress authentication, it’s also necessary to discuss WordPress authorization. In other words, how much access you grant to each of your users. This is important because lost or stolen WordPress credentials are a frequent cause of data breaches.
When adding users it’s crucial to employ the least privilege principle, which states that a user should be granted the minimum amount of privilege to perform their function. To this end, WordPress comes with several built-in roles:
- Super Admin. A super admin has access to all features on all sites in a multisite setup
- Administrator. An administrator has access to all features on a single site
- Editor. An editor can manage posts, including those authored by other users
- Author. An author can manage only their own posts.
- Contributor. A contributor can write posts, but cannot publish them
- Subscriber. A subscriber can only manage their own profile
User Role Editor is a plugin that can be used for more granular control over WordPress roles, or to create your own. Needless to say, it should be used with care. Refer to the WordPress Roles and Capabilities page for more information about the individual capabilities of each role.
Advanced WordPress Security Tips
The WordPress security tips below will require access to files on your server. If you don’t have command-line access, then it’s recommended that you use an FTP client such as FileZilla to download the necessary files and to re-upload them once changes have been made.
As always, making a complete backup of your WordPress website (and database, just to be safe) is strongly recommended.
How to Prevent WordPress Directory Listings
Here’s a quick exercise to demonstrate what a directory listing is: open a new tab, and do a Google search for index of wp-content. Chances are you’ll see many results along the lines of “index of /wp-content/uploads.”

Clicking on one of these results could open up a list of all subdirectories and files in that directory. That can be considered a security risk for any website on the internet, because:
- It could provide access to unprotected sensitive files
- It could provide access to backup copies of your site (remember, your database credentials are stored in wp-config.php)
- It provides an easy way to see which themes and plugins are installed on your website
- It could provide access to custom code that contains sensitive information
- It can help attackers understand your site’s directory structure
- Etc.
Luckily, there are easy ways to prevent WordPress directory listings. Here’s how:
- Find and open the .htaccess file in your site’s root directory. Then, add the following line to it:
Options -Indexes
- Or, simply create an empty index.html file in every directory.
Keep in mind that some WordPress security plugins will prevent directory listings by default, in which case no action is needed.
How to Manually Change the WordPress Table Prefix
The WordPress database contains all the tables that house your site’s information – from blog posts to usernames and passwords. Table names are standardized, which means that attackers know that user credentials are typically stored in the wp_users table.
This type of scenario becomes a reality during a SQL injection attack where an attacker can query the database due to a plugin vulnerability. But, should we change wp_users to, say, wp_qU117_users, with qU117 being a random string, then attackers would have a much harder time determining where to look for user credentials.
Changing the WordPress table prefix is easiest during WordPress installation. But chances are your WordPress website is already up and running, which means you’ll have to make changes directly to the database from the MySQL prompt, or via phpMyadmin. Here’s what you need to do:
- Backup everything
Before making any changes, back up your entire WordPress database. It is also highly recommended to first test the steps below on a staging or development site rather than your live WordPress website. - Update wp-config.php
Find the line in your wp-config.php file that sets the table prefix. Change it to a random string. In this example, we’re using qU117 as our random string:
$table_prefix = ‘qU117_’; - Rename database tables
From the MySQL prompt or phpMyAdmin, execute the following query:
RENAME table wp_commentmeta TO qU117_commentmeta;
RENAME table wp_comments TO qU117_comments;
RENAME table wp_links TO qU117_links;
RENAME table wp_options TO qU117_options;
RENAME table wp_postmeta TO qU117_postmeta;
RENAME table wp_posts TO qU117_posts;
RENAME table wp_termmeta TO qU117_termmeta;
RENAME table wp_terms TO qU117_terms;
RENAME table wp_term_relationships TO qU117_term_relationships;
RENAME table wp_term_taxonomy TO qU117_term_taxonomy;
RENAME table wp_usermeta TO qU117_usermeta;
RENAME table wp_users TO qU117_users;
Check your database for tables created by plugins not included above, and rename those tables accordingly.
- Update options & usermeta
UPDATE qU117_options SET option_name = REPLACE(option_name, ‘wp_’, ‘qU117_’) WHERE option_name LIKE ‘wp\_%’;
UPDATE qU117_usermeta SET meta_key = REPLACE(meta_key, ‘wp_’, ‘qU117_’) WHERE meta_key LIKE ‘wp\_%’; - Test
Testing is strongly recommended. Some plugins, for example, are hard-coded with the wp_ table prefix, in which case you may encounter functionality errors.
How to Manually Disable file Editing in the WordPress Dashboard
The reason why disabling file editing is important has already been discussed above. So, to manually disable file editing, add the following line to your wp-config.php above /* That’s all, stop editing! Happy publishing. */
define(‘DISALLOW_FILE_EDIT’, true );
The file editor should now be removed from the WordPress Dashboard > Appearance menu.
How to Remove Plugin and Theme Management From the WordPress Dashboard
You can further boost your WordPress security by removing plugin and theme management from the WordPress dashboard. This can be applicable in a scenario where an attacker gains access to an admin account.
Add the following line to your wp-config.php above /* That’s all, stop editing! Happy publishing. */
define( ‘DISALLOW_FILE_MODS’, true );
Note: It’s important that file editing is also disabled for this to be effective.
How to Manually Hide the WordPress Version
I’ve already discussed hiding the WordPress version above, but doing so manually requires editing in a few different places. Again, test this on a staging site and make backups of your WordPress files and database before getting started:
Remove the WordPress version from header tags
Add the following line to your theme’s functions.php file to remove the WordPress version from the website’s header:
remove_action(‘wp_head’, ‘wp_generator’);
Remove the WordPress version from RSS feeds
To remove the version information from the RSS feeds, you can add this code to your theme’s functions.php file:
function remove_wp_version_rss() {
return ”;
}
add_filter(‘the_generator’, ‘remove_wp_version_rss’);
Remove the WordPress version from script and style tags
Just like before, add the code below to your theme’s functions.php file:
function remove_script_version($src) {
return $src ? esc_url(remove_query_arg(‘ver’, $src)) : false;
}
add_filter(‘script_loader_src’, ‘remove_script_version’, 10, 1);
add_filter(‘style_loader_src’, ‘remove_script_version’, 10, 1);
Remove the WordPress version from the admin footer
To remove the WordPress version from the footer in the admin panel, add this code to your theme’s functions.php file:
function remove_wp_version_footer_admin() {
remove_filter( ‘update_footer’, ‘core_update_footer’ );
}
add_action( ‘admin_menu’, ‘remove_wp_version_footer_admin’ );
Block access to readme.html
Older WordPress versions also display the version of the installation in readme.html located in the site’s root directory. If, for any reason, you can’t update your site, add the following to .htaccess which is also located in your site’s root directory:
<Files “readme.html”>
Order allow,deny
Deny from all
</Files>
What To Do Next
Some of the WordPress security tips above only need to be done once, such as choosing a secure WordPress host, using an SSL certificate, and enabling auto updates. But WordPress security isn’t just “set and forget.” Keeping your information and visitors safe requires cultivating security best practices into a habit. Make backups part of your daily or weekly routine, and monitor your users, plugins, and themes. Subscribe to a WordPress security email list to get announcements about newly discovered plugin and theme vulnerabilities – sometimes before a fix is released by the developer. While this may be time-consuming, you’ll be in a better position to ward off potential attacks and have the means to get back on track in the event of a breach.
Then again, with Sunny HQ’s WordPress maintenance service, security, and backups are on us. You’ll save huge amounts of time, and have the benefit of a secure WordPress host looking after your site and your visitors while you focus on mission-critical tasks.