
Airstream Supply Company, Weber, and Singer are just a few big names that use WooCommerce to power their stores and manage sales. WooCommerce is a free WordPress plugin that can be the perfect starting point to power your side hustle or nationwide eCommerce platform.
In this guide, we’ll show you how to get started with WooCommerce and slip in some helpful marketing tips to help your store stand the test of time.
Contents
How to create a WooCommerce product
Getting started with an eCommerce marketing strategy
The basics of WooCommerce Search Engine Optimization (SEO)
What is WooCommerce?
WooCommerce is a fully-fledged eCommerce plugin for WordPress with more than 5 million active installs at the time of writing. It comes jam-packed with everything you need to set up your online store, offer secure payment methods, manage orders, and get detailed customizable analytics that help you track sales. Default functionality can be extended with add-ons that make it possible to accept bookings and appointments, sell courses, and much more.
WooCoomerce integrates seamlessly with various payment gateways, including PayPal, Stripe, Authorize.net, and Amazon Pay among others. In mid 2020 WooCommerce launched its own payment gateway, WooCommerce Payments, which enables merchants to accept debit and credit cards directly on their WordPress websites. More on this below.
How to Install WooCommerce
WooCommerce can be downloaded from the WordPress plugin repository. Use the plugin dashboard to upload WooCommerce to your WordPress website.

But the easiest way to install it on your website is to open up the WordPress dashboard and navigate to Plugins > Add New.

Type WooCommerce into the search field on the Add Plugins page. Click on Install Now.

Click Activate to activate the plugin and start the WooCommerce Setup Wizard.

The WooCommerce Setup Wizard
The WooCommerce Setup Wizard provides a user-friendly interface that makes it easy to get started with your new store. Just enter your details as prompted and you can be on your way to eCommerce glory in just a few minutes.
Just remember, nothing you enter into the Setup Wizard is final. Correct typos and amend details at any time – just head on over to WooCommerce > Settings from the WordPress dashboard.
Let’s get started.
Enter your store HQ’s address on the first screen of the WooCommerce Setup Wizard. WooCommerce will use this address on invoices, to configure currency, and to help you get set up with shipping and taxes.
Click Continue to proceed.

Choose the industry in which your store operates. What you choose here won’t affect your store or how it operates.

Over the years WooCommerce has evolved into a platform that can be used to sell different types of products on the internet. But not all of them are part of the default WooCommerce setup. The product type screen makes things a little easier by automatically installing the plugins or add-ons needed to sell the types of products or services you want to sell.
Note: Some of the product types displayed require a paid monthly or annual subscription.
WooCommerce Setup Wizard Product Types Explained
| Physical products (Included) | Physical products are tangible products that require shipping to your customer’s location. Examples include art, computers and computer parts, pet products, clothing, beauty products, and so on. |
| Downloads (Included) | WooCommerce makes it easy to sell ebooks and software products that have to be downloaded once payment is complete. |
| Subscriptions (Free) | Accept recurring payments for virtual and physical products. |
| Memberships (Paid) | Sell memberships and restrict content to different membership levels. WooCommerce memberships can be combined with the Subscription product type to accept recurring payments along with other nifty features. |
| Bookings (Paid) | Create a bookable product, add time slots, and customers can now book massages, consultations, or any other time-billable service. If you want to add hotel bookings to your site, check out the free Accommodation Bookings add-on. |
| Bundles(Paid) | Bundle related products together with this WooCommerce add-on. Moreover, your customers can mix and match bundles themselves. |
| Customizable products (Paid) | With the customizable products add-on, the shopping experience becomes personal. Create custom fields that will allow customers to choose gift wrapping for their products, add a special message, etc. |

Next up, WooCommerce wants to know about your business under the Business details tab at the top.

The Free features tab contains add-ons and plugins that are optional. They can also be installed later.

On the final page of the WooCommerce Setup Wizard, you can optionally choose a theme. This isn’t a store theme, but rather a global WordPress theme. So if you already have a configured theme that supports WooCommerce, choose Continue with my active theme.
Also read: 8 Features Your E-commerce Website Needs To Be Successful

How to Create a WooCommerce Product
So far, so good. But what’s WooCommerce without a product or service to sell? WooCommerce makes it easy to get started by helping you create your first product with guided instructions.
Recommended: If you’re just testing the waters with WooCommerce, feel free to continue with the product setup below. But if you’re ready to start selling, it’s recommended to get your product titles, descriptions, and media done and dusted before you start creating products. In the long run this will mean less work and a quicker path to your first sales. Refer to WooCommerce Search Engine Optimization for more information.
Ready to continue?
Click Add Product. You can also add a product at any time from the WordPress admin menu by navigating to Products > Add New.

Once you’ve clicked Add a Product, the WooCommerce Quick Start continues. Choose whether you want to add a physical product (e.g. shoes, computer equipment, or art) or a digital product (e.g. ebooks, music, or a downloadable app). Other product types selected within the WooCommerce Setup Wizard will also be displayed here.
If you’re adding a product from the WordPress admin menu, you can select or change the product type on the product page.

Next, give your product a title. Refer to Optimize WooCommerce product titles for tips on creating product titles that’ll win search engines and customers.

Use the product description block to add more details about your product. Check out Optimize product descriptions for tips on creating optimized product descriptions.

The Product Data section is where you can manage technical information about your product such as product type, price, stock, variations, shipping, and much more. Here’s a brief explanation of each available option:
| Product Data | Virtual | A virtual product doesn’t require shipping. Examples include services, bookings, etc. |
| Downloadable | A downloadable product isn’t shipped and can be downloaded from My Account > Downloads. If a product is download-only, ‘Virtual’ does not have to be checked. | |
| Product Type | Simple Product | A Simple Product is an individual product without any variations or options. |
| Grouped Product | Group related individual products (that can be purchased separately) together under a grouped product. | |
| External/Affiliate Product | Create an Affiliate Product sold by another company or seller. The purchase is completed on the seller’s website. | |
| Variable Product | Create a Variable Product if your product is available in different colors, sizes, or other variations. You’ll be able to control the price, stock, image, etc., for each variation. | |
| General | Regular price | Set the standard product price. This price will apply outside scheduled sale periods. |
| Sale price | Set the sale price for a product. You can also schedule the sale period by clicking the Schedule link. | |
| Inventory | SKU | The Stock Keeping Unit (SKU) is a unique ID that you can assign to a product. When left empty, the SKU is set to null. |
| Manage stock? | Check this option if you want to manage stock levels, accept backorders, and set the threshold for low stock-level notifications. | |
| Stock status | Should the product be listed as “In stock”, “Out of stock”, or “On backorder”? Choose here. | |
| Sold individually | Check this option to limit the number of purchases per product to one. Use this option for popular products with limited stock quantity. | |
| Shipping | Weight | Specify the weight of the product. The weight unit can be set from the admin dashboard under WooCommerce > Settings > Products |
| Dimensions | Specify your product dimensions in length x width x height. The measurement unit can be set from the admin dashboard under WooCommerce > Settings > Products | |
| Shipping class | Used by certain shipping methods to define shipping rates for products assigned to this shipping class. Shipping can be set up from the admin panel under WooCommerce > Settings > Shipping | |
| Linked Products | Upsells | Upsells are usually add-ons or premium versions of the currently viewed product. |
| Cross-sells | With cross-selling you offer customers related products. This helpful feature helps increase the size of the order. | |
| Attributes | Custom product attribute | Custom Attributes display additional product data, like color options. Variable Products require custom attributes and terms to be defined for the product variations. Attributes can be managed on the product page, or from the admin panel under Products > Attributes. |
| Variations (Variable Products) | Here you can create product variations, e.g. different colors. Variations require product attributes to be configured first. Each variation can be managed individually. | |
| Advanced | Purchase note | Use the purchase note to include a brief thank you, product-specific instructions, or customer service options. Purchase notes are displayed for orders that have a “Processing” or “Completed” status. |
| Menu order | Set the order in which products are displayed. Products with a menu order of ‘0’ will be displayed before all other products. The product with the highest menu order (e.g. ‘999’) will be displayed last. | |
| Enable reviews | Choose whether you want to enable reviews on the product page. | |
| Get more options | A list of promoted WooCommerce extensions. |

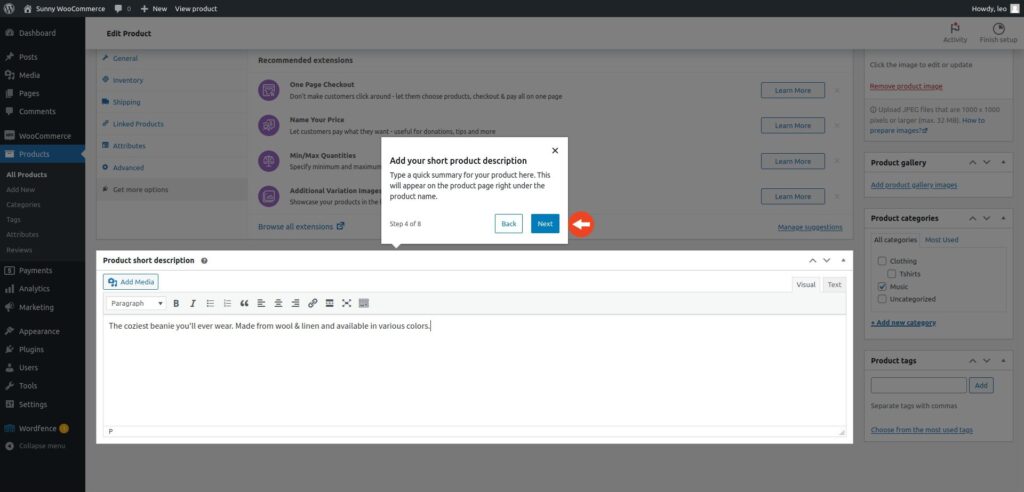
Once you’ve added all relevant product data it’s time to add a 20 to 50-word short description, which is a concise overview of the product. If you’ve already done keyword research, use your product keyword in the short description to maximize your SEO gains.
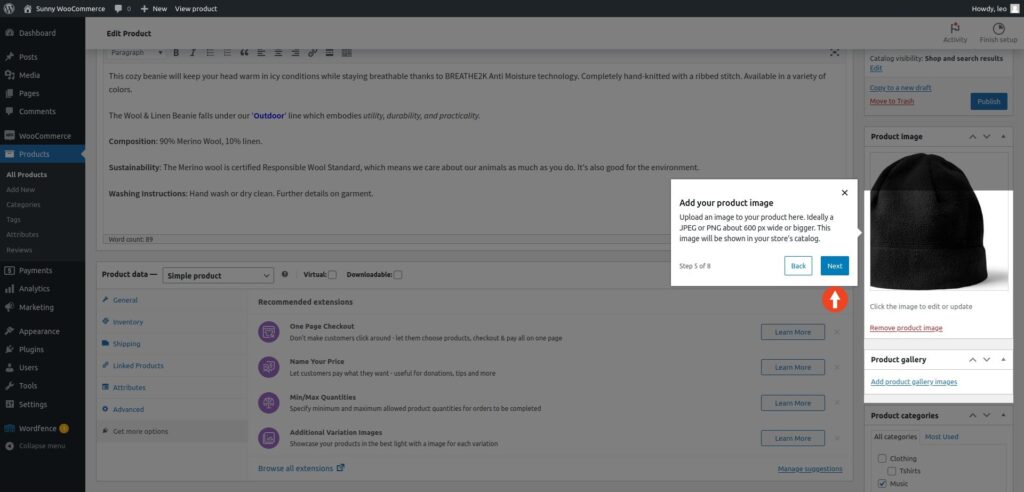
The product image is the main image of your product. It is used as the default image on the product page and also on the shop category pages. WooCommerce suggests product images that are 1000 x 1000 pixels or larger. Refer to Optimize your images for help naming your images, shrinking image file sizes, and creating SEO-friendly alt tags for your images.
Product tags provide another way for customers to navigate through your store. These are descriptive keywords about a product, which may feature in other products. For example, in our fictional clothing store, we categorized our beanie under clothing. We can add ‘Linen’ and ‘Merino Wool’ and ‘BREATHE2K’ as tags. When a customer clicks on the ‘Merino Wool’ tags, for example, a new page opens up showing all products tagged with ‘Merino Wool’.

Where tags refer to features products might have in common, categories tell visitors about the ‘type’ of product. Our Merino Wool and Linen Beanie is a clothing item, which means it would be assigned to the ‘Clothing’ category. Since our fictional store can be set up to sell different types of beanies, ‘Beanies’ will be added as a subcategory.
Important: Categories are used to create the URL of your product which can affect your SEO performance. Avoid adding excessive subcategories.

That’s all there is to it. When we click Publish our beanie will be added to the products page.

When you return to the WooCommerce Dashboard, the Quick Start has a few steps remaining. Whether you continue with these steps is down to preference and what’s best for your store. Here’s a brief overview of each remaining step:
Set up WooCommerce Payments: WooCommerce payments is a payment processing service that allows you to accept debit and credit cards in WordPress. But just like other payment processors, like PayPal, WooCommerce payments charge a fee per transaction. Does WooCommerce Payments offer the best rates? Does it operate in the country where you’ll sell your products or services? Do a little research to identify the best payment gateway(s) for your store.
Add tax rates: If you need to add sales tax you can choose between WooCommerce Tax or Avalara for automatic tax calculations. Both these require the installation of at least one additional plugin. WooCommerce Tax is free, while Avalara offers a 30-day free trial. If your site operates outside the US, check whether tax calculations for your country are supported before installing the additional plugin.
Get more sales: A list of recommended marketing extensions. But rather than magically attract new customers to your store, these extensions simply facilitate seamless integration with your WooCommerce store / WordPress website.
Personalize your store: Import products, create a custom homepage, add a logo to your store, and set a store notice. All of these steps can be completed later from the WordPress and WooCommerce dashboards.
Managing WooCommerce Orders
Manage orders in WooCommerce by navigating to WooCommerce > Orders in the WordPress admin menu. Here you’ll find an overview of all orders.

Click on an order to see order details, edit order statuses, and view system order notes.

Some orders will require manual intervention. Bank transfers, for example, will require you to update the order status manually. The order status is reflected on your customer’s account.
WooCommerce Order Statuses
- Pending payment: The order has been received but payment hasn’t been initiated.
- Processing: Payment has been received and the order is being processed by the seller.
- On hold: Payment has to be confirmed by the seller.
- Completed: The order has been paid and fulfilled by the seller.
- Canceled: The order has been canceled by the seller or the customer, and the stock has been returned to the WooCommerce inventory.
- Refunded: The order has been refunded by the seller.
- Failed: Payment didn’t go through or has to be authenticated by the customer.
- Draft: A draft order is created when the customer starts but does not complete the checkout process.
WooCommerce Order Actions
Order actions facilitate point-and-click functionality for certain customer interactions. These include:
- Email invoice / order details to customer: This can be helpful when a customer didn’t receive the initial order invoice, or when customer details have been updated before the order is completed.
- Resend new order notification: Same as above.
- Regenerate download permissions: Use this option when downloads aren’t working, when the range of downloadable items has changed, or when you have changed download restrictions.
When you’ve made changes to the order, click Update. Changes are recorded under ‘Order notes’.
WooCommerce Analytics
WooCommerce includes its own analytics section in the WordPress Dashboard. It’s packed with all the metrics you’ll need to keep an eye on your store’s performance. Access WooCommerce analytics by clicking Analytics in the WordPress admin menu.
The Overview page provides a summary of many of the other pages you’ll find under Analytics. Easily customize the content of each section of the page by clicking on the vertical ellipsis to the right of the section title.
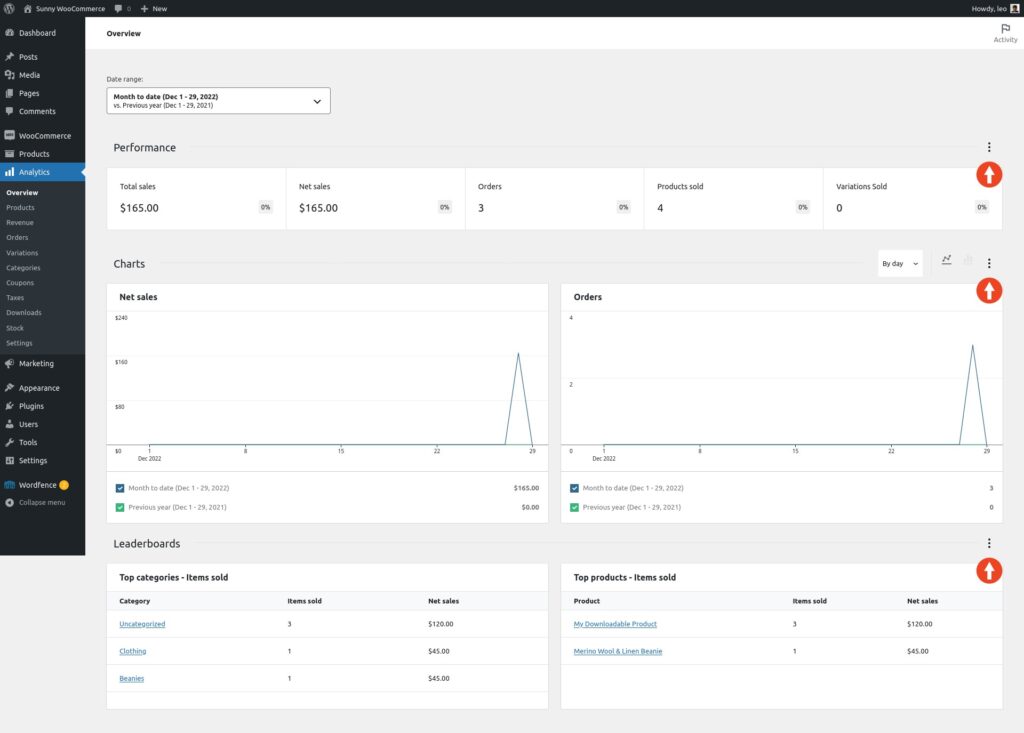
Coupons, Taxes, Downloads, and Stock aren’t included on the Overview page. Click the respective menu item in the WordPress admin panel under Analytics to view analytics data for each.
Use Analytics > Settings to further customize analytics data by including or excluding statuses and customizing the default date range for which data is displayed.
Getting Started With an eCommerce Marketing Strategy
WooCommerce provides seamless integration with many different marketing tools to simplify the road to continued online selling success.
But rather than simply adding value to the WooCommerce experience, this might be strategic: running an online store in a competitive marketplace can be challenging. Given that 9 out of every 10 online stores fail due to poor marketing efforts and not being visible in search results, these tools can help you outlast your competitors.

Says marketingsingals.com MD Gareth Hoyle in this Internet Retailing article:
“It’s clear to see that having an online presence and being visible on search engines is a key area e-commerce startups need to focus on to ensure they succeed. As nine in ten online startups fail within their first 120 days of business, it’s incredibly important that business owners put provisions firmly in place well before launching – this must include a bulletproof search visibility and online marketing strategy, as well as ensuring there is a market for their product offering.
Hoyle continues to say that “a targeted, strategic approach to digital marketing is vital to the success of any online business in this day and age, only more so for small businesses who are just starting out. Many tools can be used to increase their brand awareness and search visibility in their first few days and weeks, where consumer trust and loyalty hasn’t yet been established.”
Of course, developing that “targeted, strategic” approach is easier said than done, especially when you’re new to the eCommerce or online marketing spheres. Here are a few tips to help you develop your first eCommerce marketing strategy. Get this done before you start selling since it will affect how you create titles, descriptions, which images you select, etc.
1) Define goals and milestones
Let’s be honest, “I want to make more money” is a poor goal. It’s ambiguous and can also refer to making $1 more than last year. Be clear about what you want to achieve, and what milestones you need to reach to get there. But also be realistic.
A goal, for example, can be to build a WooCommerce-powered side hustle that rakes in $500,000 a year in profits selling premium headwear. One of your first milestones could be to get 1,000 unique visitors a month to your online store. Since the first $1,000 in profits is often the hardest to achieve, make that your first milestone.
Make your second milestone a little more ambitious: 3,000 unique visitors, 500 return customers, $10,000 profit, and getting featured in 5 mid-tier fashion magazines.
Just an example, but you get the idea.
2) Define your target audience
Your target audience is the people most likely to buy your product or service from your WooCommerce store. If you’re unfamiliar with the concept of a target audience, think about people who’ve already purchased the product you want to sell somewhere else. Make notes about:
- Gender
- Age
- Location
- Marital status (if applicable)
- Income
- Occupation
- Interests
- Buying behavior
- Online behavior
Defining your target audience will help you to:
- Develop your brand and voice (you won’t use surfer slang to sell high-end ties, would you?)
- Develop product positioning (the features or benefits they like are what you’ll use to promote your product. Read more about product positioning here)
- Know on which platforms to promote your product (Some people like Pinterest while others prefer Instagram)
- Develop a content marketing strategy
When it comes to defining a target audience, “Everyone” isn’t the right answer. If you’re worried about losing sales because you’re only focusing on a segment of potential customers, just remember that you can always expand your audience definition later. Much of doing business online is about tweaking things for better results as you move along.
3) Define your Unique Selling Proposition (USP)
Your Unique Selling Proposition (USP) is something that should make it clear to potential customers why they should spend their hard-earned cash at your online store rather than your competitor’s store. In many cases, a USP solves a problem. Check out these Selling Proposition examples of some of the biggest brands around for inspiration.
4) Research, research, research!
It’s tempting just to wing it when you start with your WooCommerce store. But putting in the time to conduct a little research can go a long way to position your brand for success.
Competitors
Competitor research is right up there with defining your USP and will help inform your overall strategy. Start by identifying your closest competitors and then determine:
- Who are their target audiences? (You can deduce this from the words they use in their marketing copy, the style and tone of their copy, the types of products they sell, etc.)
- How do they promote their online stores?
- What is the checkout process like, and where can you improve?
- Which SEO keywords do they use for the same products?
- Do they maintain a blog?
- How often do they send out newsletters?
- On which social media platforms are they active, and how often?
Most importantly, how can you improve on what your competitors are doing?
Pricing
You can easily research competitors with Google alone, but you might have to put in a little more effort to price your wares.
Not all suppliers list their prices online. So you might have to hit the road to find suppliers and physically inspect the quality of their products. Remember, the cheaper your suppliers, the bigger your profit margin per product.
At the same time, you’ll have to think about packaging, sales taxes, and shipping, and be willing to fight for a better price on each point.
The Basics of WooCommerce Search Engine Optimization (SEO)
“If a tree falls in a forest and there is no one around to hear it, does it make a sound?” is a philosophical thought experiment that asks the question of whether something exists if it isn’t perceived.
The purpose of search engine optimization for WooCommerce is to ensure that your products can be found by people who want what you have to sell. This makes WooCommerce SEO a vital part of running your online store.
If this drains the blood from your face because of all the technical SEO jargon you’ve come across on the internet, fear not: the basics of SEO are pretty straightforward and can help you go a long way.
Remember: Always aim to create good people-focused content. When that’s done, optimize for search engines.
Also read: WordPress SEO Tool Trends
Let’s take a look at a few tips to get the WooCommerce SEO benefit.
Step 1: Research WooCommerce product keywords
You’ll need keywords – the words or phrases people enter into search engines – for your products before you start writing page titles and product descriptions. Keyword research tools – both free and paid – help make the job a little easier. Here are a few options to choose from:
- Google Keyword Planner (Free)
- Ryob.com (Free)
- WordStream (Limited free, paid)
- SEO Power Suite (Limited free, paid)
- SEMrush (Free trial, paid)
- Ahrefs (Paid)
- Majestic (Paid)
Get started with any of the free tools if you’re just starting out. Once you start getting results, you can switch to a paid option to get more keyword and site data to fine-tune your SEO game.
Example:
Going with the pretend wool beanie we created during the WooCommerce Quick Start, let’s see if our “Beanie in Wool & Linen” hits the keyword mark.
We started by reducing our title to its most basic form, “wool beanie”, and entered it into the Google Keyword Planner.
As you can see below “wool beanie” and “merino wool beanie” have the same number of average monthly searches. Given that the latter is more descriptive of our product, we can use it as a starting point.

Step 2: Optimize WooCommerce product titles
The product title is also the page title. It tells visitors and search engines about your product. This means it has to be unambiguous and to the point.
Since you’ve already researched your main keyword, take a moment to think about descriptive words your target audience might include in their searches. If they include those descriptive words, it means that those features are important to them, which makes it a must-have in your title alongside your keyword.
Example:
Using our “merino wool beanie” keyword, we can list a few descriptive words such as “men’s, warm, BREATHE2K, hand-knitted, Responsible Wool Standard, sustainable, washable” and so on. You know your audiences best, so you’ll know which features are important to them.
Our fictional audience cares about comfort but some also care about the environment. Here’s what we came up with:
“Sustainable Linen and Merino Wool Beanie for Men”
Or, if our product was aimed at men worried about perspiration:
“Breathable Men’s Merino Wool Beanie”
Can it be better? Probably. But you get the idea.
Step 3: Optimize product descriptions
Your product title should contain the most important information audiences need to decide whether what you’re selling is worth investigating. Everything else can be added to the product description in descending order of importance.
Remember:
- Write unique product descriptions aimed at the needs or interests of your audiences
- Use short sentences and short paragraphs when writing your product description
- Use bulleted lists where suitable
- Add images and / or videos
- Product descriptions should be at least 300 words in length
Your product description should also contain your keyword and related keywords. Ideally, you’d want to use your primary keyword in the first and last sentences of the product description, and then evenly distributed throughout the body. Synonyms and other related phrases can also be used to dilute keyword density and broaden the scope of keywords you could rank for.
Note: More keywords do not equal better results. Just write naturally.
Step 4: Enable breadcrumbs
Ah, breadcrumbs! They can help you find your way through a forest of product pages. In other words, they simplify navigation, and they’re good for SEO. Here’s what they look like on our example store:

If a visitor wants to see what other beanies are in stock, they can navigate to the Beanies category page with a single click. If they’d like to see what other clothing items are available in our fictional store, they’d click Clothing.
The breadcrumbs feature is enabled by default in WooCommerce. But if breadcrumbs are not displaying on your site, check your theme’s documentation for a built-in breadcrumbs feature. Alternatively, search the WordPress plugin database for a WooCommerce-compatible breadcrumb plugin.
Step 5: Optimize your images
Back in 2018 Jumpshot revealed that over 20% of all U.S. web searches are through Google Images. That’s no surprise since people are visual beings. We love to buy things that look appealing.
Images are also easy to consume, which is why it makes sense to include them in your product description in addition to your main product image(s). And with some optimization TLC, they can give your online store a healthy SEO boost. Here’s what to consider:
Image size
Image size matters in more ways than one when it comes to SEO. WooCommerce recommends main product images of at least 1,000 pixels x 1,000 pixels. Maintaining such large image dimensions for full-size images in your product description can benefit your sales.
But, big images are, well, big. They can take up a lot of storage space and may take ages to load on slower connections. This can be an SEO red flag and hurt your rankings.
Use a tool like TinyPNG to reduce your image size while retaining its original dimensions and quality. WP Smush is a WordPress plugin that achieves the same. The choice is yours.

Optimize image file names
When you use descriptive image file names you’re telling search engines what your image is about. Add in your product keyword, keyword synonyms, or related terms, and it complements the rest of the product content on that page.
Use these tips to name your images:
- Be descriptive and use keyword(s)
- Use hyphens to separate words
- Keep file names short (up to 6 words)
- Use lowercase letters
- Do not use special characters (e.g. ‘%’, ‘^’, ‘#’) in your file names
Use image alt tags
Just like the image file name, alt (alternative text) tags are used to describe the content of an image. Alt tags are used when the browser can’t render the image. It is also a crucial element of site accessibility for visually impaired individuals who use screen readers and is a requirement under the American Disabilities Act.
Alt tags should:
- Be concise yet descriptive
- Contain keywords relevant to the content of the image
- Be 125 to 140 characters in length
- Not contain special characters unless necessary
Just like image titles, alt tags should also be unique. Edit the alt text of an image by clicking the image in the WordPress media library.
Wrapping Up
WooCommerce is one of the best eCommerce plugins around for your WordPress website. With a Setup Wizard to guide you through the entire setup process, you can have your first products listed in just a few minutes.
But to avoid becoming another eCommerce 120-day casualty, take the time to develop a solid marketing strategy:
- Define your goals and milestones
- Know who’s most likely to buy your products
- Stand out among your competitors with a clear USP
- Research your competitors
- Put in the time to find the best prices without sacrificing product quality
Once that’s done, focus on getting search engines to notice your website. This means:
- Researching your WooCommerce product keywords
- Optimizing product titles and descriptions
- Optimizing product images
It can be a lot of work, we know. But you don’t have to go the distance alone. With SunnyHQ’s WordPress website management, we deliver end-to-end hands-on care for your entire site as well as your WooCommerce store. Contact us today to find out more!