The WordPress White Screen of Death (a.k.a. WSoD) is a blank white screen that replaces your site’s entire front end or sometimes just a single page. It usually appears when the page rendering process is interrupted by bad or corrupted code or insufficient system resources.
The WordPress White Screen of Death can cost you visitors and conversions, and negatively affect your site’s search engine ranking. But it doesn’t have to be that way. Use the cheat sheet below to work your way toward a solution.
Keep in mind: If you’re already pressed for time and can’t afford any losses, professional WordPress website maintenance could be just what you need – it’s expert assistance that carries the technical load so that you can move forward without distraction.
How To Fix the WordPress White Screen of Death – Cheat Sheet
The WordPress White Screen of Death can be stressful, especially when it threatens your business. But rather than frantically trying random solutions, take a calm, methodical approach. Experience suggests this is often the quickest way to restore your site back to a fully operational state.
Step 1: Check the logs
Check the logs for clues that point to a possible cause. It can save heaps of time and quickly reveal the cause of the WordPress White Screen of Death. See:
Find and access web server error logs
Step 2: Disk space, memory, post length, encoding
Logs can be pretty messy and hard to understand. If there’s nothing obvious indicating errors with plugins, themes, or snippets of code in functions.php, start by applying non-invasive changes to your site. These are changes that raise minimum limits without affecting your WordPress site’s files or database. See:
How to check your WordPress memory limit
Increase the WordPress memory limit
Add WP_MEMORY_LIMIT to wp-config.php (recommended)
On a Linux virtual machine? Also check RLimitMEM
Step 3: Use a process of elimination to identify bad plugins/themes
Themes and plugins are basically just files full of code. The more code there is, the greater the risk that something will break. See:
Deactivate & reactivate your WordPress plugins
Pro tip: Always work on a copy of your site
If you don’t know where to look or what to fix, work on a copy of your live site as you test possible solutions. It’s easy to get distracted and forget what changes you’ve made. This can create additional problems on a live site and cause even more downtime.
Also read: 7 WordPress Website Maintenance Mistakes and How to Avoid Them
Find and Access Web Server Error Logs
All web servers – the software that makes it possible to serve your site to the world – keep track of everything that happens on a website. Your site is no different. When someone visits your site, it’s logged. When there’s an error on your site, that’s often logged too.
When stuck with the WordPress White Screen of Death, your site’s error log should be your first port of call. It can often help save time identifying the problem and eliminate any unnecessary trial-and-error steps.
Most logs are stored in plain text files that can be opened with Notepad or any other text editor app. Their location, however, will depend on the web server you’re using.
Here’s where to find the logs for some common control panels and web servers:
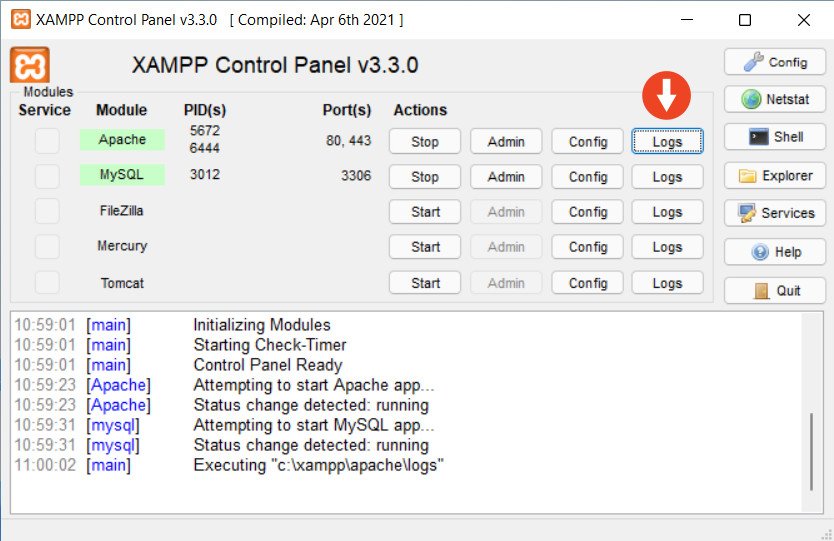
XAMPP (Windows): Click on the Logs button in the XAMPP control panel. Here you’ll find both the Apache and PHP error logs.
cPanel: Metrics > Errors

Linux: The exact location of the logs depends on the web server being used. For example:
- Apache (Linux): /var/log/apache/<site-name>-error.log
- NGINX (Linux): /var/log/nginx/<site-name>-error.log
Enable WP_DEBUG
WordPress comes with an error-reporting debug mode that can be more detailed than your web server logs. WP_DEBUG is disabled by default, which means you have to enable it by editing your wp-config.php file.
Here’s how:
Navigate to your site’s document root (the place where all your WordPress files are stored), and add the following lines to your wp-config.php file just above “That’s all, stop editing! Happy publishing.”
// Enable WP_DEBUG mode
define( ‘WP_DEBUG’, true );
// Enable Debug logging to the /wp-content/debug.log file
define( ‘WP_DEBUG_LOG’, true );
// Disable display of errors and warnings
define( ‘WP_DEBUG_DISPLAY’, false );
@ini_set( ‘display_errors’, 0 );

The double-slash (‘//’) lines explain what the code immediately below does. From top to bottom:
- WP_DEBUG mode is enabled
- WP_DEBUG writes all output to a log file called debug.log in the wp-content folder
- The last section is especially useful if you have no choice but to diagnose WordPress White Screen of Death on a live site: it prevents errors from being displayed on the site’s front end.
Analyzing logs
The error logs may appear to contain unintelligible gibberish. Luckily you don’t need to understand everything to find clues that may lead to the likely culprit of your WordPress White Screen of Death.
Do this:
- Make a note of the time
- Reload your site, or the page displaying the WordPress White screen of death
Logs are ordered sequentially and accompanied by a timestamp. Find the log entries that match the time you loaded your site or the affected page.
Check Disk Space and Increase the WordPress Memory Limit
A script running on your website may need more than your site’s allocated resources. Both disk space and memory can play a role.
Disk space
Virtually all shared hosting accounts come with a control panel like the popular cPanel. In addition to providing you with useful tools to manage your sites, it also provides you with useful statistics about your account, including disk space.

If you find that your allocated disk space is filled to the brim:
- Remove temporary files
- Download and then delete old site backups (these can take up a lot of space)
Or, ask your host to allocate more space to your account.
How to check your WordPress memory limit
Before you can increase the amount of memory accessible to WordPress, you have to know how much RAM is currently accessible to your WordPress installation. Luckily, there’s an easy way to find out:
Go to Tools > Site Health in the WordPress admin panel. Once the page has loaded, click on the Info tab at the top, and expand the Server toggle. Find PHP memory limit in the left-hand column.

Increase the WordPress memory limit
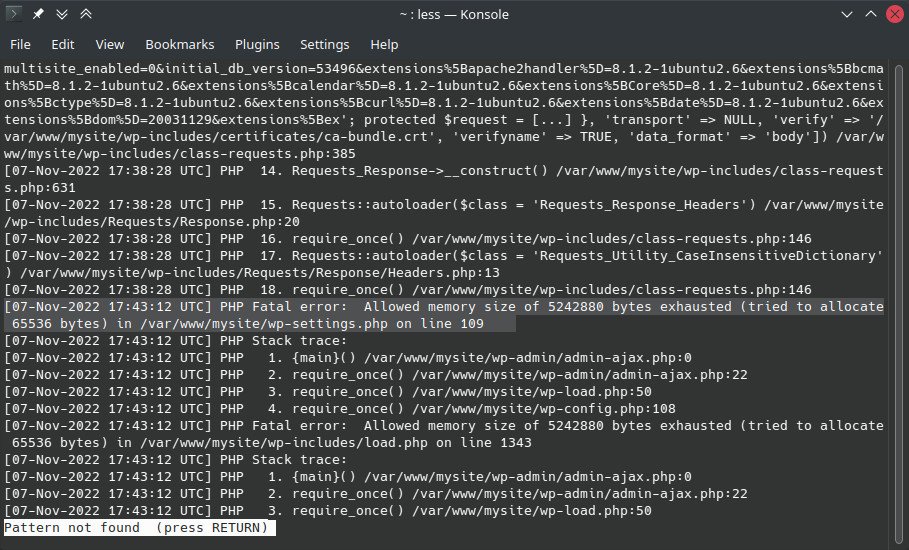
This error was posted to wp-content/debug.log for a test site created for this post:
[07-Nov-2022 17:45:19 UTC] PHP Fatal error: Allowed memory size of 5242880 bytes exhausted (tried to allocate
65536 bytes) in /var/www/mysite/wp-settings.php on line 196
To create this error we dropped the memory allocated to the website to just a few megabytes and tried running WordPress’s Site Health screen. As you can guess, the browser returned a blank page.
Increasing the memory available to your site is easy. Keep in mind that you cannot exceed the total amount of memory allocated by your host (for shared hosting accounts) or server spec (for virtual and dedicated servers). Here are a few ways to increase your site’s available memory:
Add WP_MEMORY_LIMIT to wp-config.php (recommended)
Navigate to your site’s document root (the place where all your WordPress files are stored), and add the following line to your wp-config.php just above /* That’s all, stop editing! Happy publishing. */
define(‘WP_MEMORY_LIMIT’,’256M’);
Replace 256M with your desired memory limit.

Increase PHP.INI memory limit
PHP.ini is the configuration file for applications that use the PHP scripting language, like WordPress.
If you’re on shared hosting using cPanel, you can change the PHP.ini memory limit by navigating to Software > cPanel MultiPHP INI Editor. Select your site from the dropdown (if applicable), and look for memory_limit in the PHP Directive column.

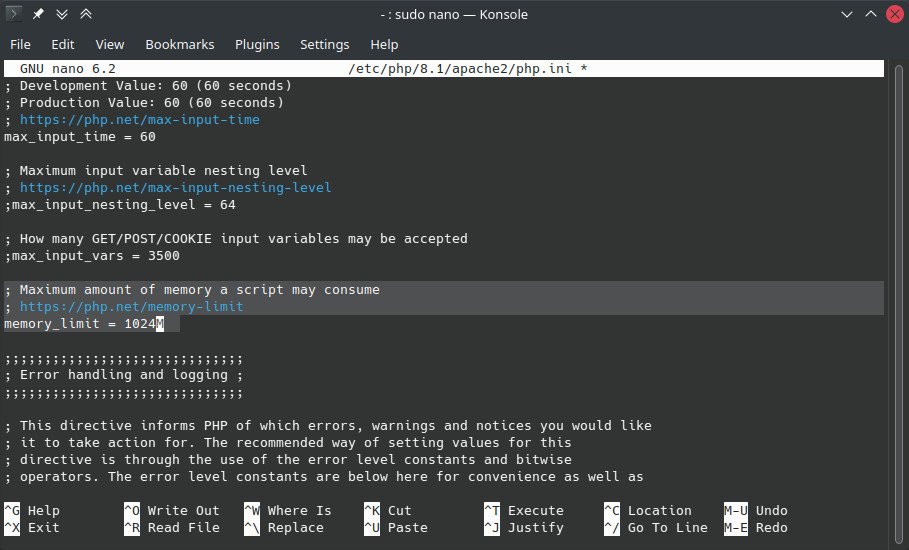
If you’re on Linux, you can change PHP.ini memory limit using a text editor:
sudo nano /etc/php/<your-php-version>/apache2/php.ini
Find the memory_limit directive and increase it as needed.
Tip: On a Linux virtual machine? Also check RLimitMEM
Some software applications, like web-based control panels, can impose memory limits by defining RLimitMEM in apache2.conf or the .htaccess file.. If RLimitMEM is defined and these limits are too low, you’ll likely end up with the WordPress White Screen of Death. Increase the limit by entering new values in bytes.
RLimitMEM 268435456 402653184
The first value (256MB) is a soft limit, and the second value (384MB) is a hard limit. You can use Unit Converter to convert from MB to bytes.. Alternatively, try:
RLimitMEM max
Change Theme and Deactivate WordPress Plugins
Next to disk space and memory limitations, plugins and themes are often the cause of the WordPress White Screen of Death. A missing semicolon here, or a snippet of archaic PHP code over there can easily wreak havoc with your entire site. But which one?
If the web server’s logs or debug.log in wp-content haven’t shed any light on the identity of the misbehaving extension, you have no option but to take the long way around: deactivating and reactivating plugins and themes, one by one. On the upside, thanks to WordPress’s fatal error protection (since WordPress 5.2), you should still have access to the WordPress dashboard.
If you don’t, check your inbox for an email from your website with the subject “Your Site is Experiencing a Technical Issue”. This email contains a link to a special recovery mode that can be used to access the dashboard.
Change your theme
It’s good practice to keep one of WordPress’s default themes on your site, just in case. Or if you are using a default theme, then simply a different theme.
Navigate to Appearance > Themes in the WordPress admin panel, and activate a different theme.

Open your site or the specific page that displayed the WordPress White Screen of Death to see if a theme change restored your site back to an operational state.
Deactivate & reactivate your WordPress plugins
Any number of plugin-related issues can cause a WordPress White Screen of Death. These include plugin conflicts (with other plugins, themes, or code snippets), badly coded plugins, and corrupted update processes.
Also read: How to Update WordPress Safely: A Step-by-Step Guide
Determine whether a plugin is at fault by bulk deactivating all of your site’s plugins. Then test your site. If the WordPress White Screen of Death is gone, then proceed to reactivate your plugins one by one, testing site functionality after each activation.

If your site still displays the WordPress White Screen of Death even with all plugins disabled and a new theme activated, try reinstalling the WordPress core (Admin panel > Dashboard > Updates).

What to Do Next
Fixing the WordPress White Screen of Death can be challenging but rewarding: it comes with a learning curve that leaves you a little more skilled when all’s said and done. But it should also emphasize the importance of regularly backing up your WordPress website: before and after you make any changes. Should things go sideways, you’ll always be able to get back on track without suffering too much downtime.
If you’d like to avoid this problem altogether, give us a call. We’re WordPress management experts and we take complete care of your site so you can focus on running your business!