
How to Show Shipping Options in WooCommerce
Key Takeaways
- WooCommerce shipping depends on zones, methods, and classes — each must be configured correctly for rates to appear.
- Missing or misconfigured zones are the most common reason shipping options don’t show at checkout.
- Conditional logic and plugins can help create flexible, location-based or product-based shipping rules.
- Displaying clear shipping choices reduces cart abandonment and improves customer trust.
Quick Reference
| Feature | Purpose |
|---|---|
| Shipping Zones | Define geographic areas and link them to shipping methods. |
| Shipping Methods | Determine how customers pay for delivery — flat rate, free, or live rates. |
| Shipping Classes | Group similar products to assign specific rates (e.g., “Heavy” items). |
| Local Pickup | Allow customers to collect orders in person. |
Key Definitions
| Term | Meaning |
|---|---|
| Flat Rate | A fixed shipping fee per order or per item. |
| Conditional Logic | Rules that control which shipping options appear based on cart contents or location. |
| Carrier Rate | Live rates from USPS, FedEx, DHL, or UPS pulled through plugins. |
Customers expect clear shipping options at checkout — but in WooCommerce, getting them to display correctly isn’t always a plug-and-play process. Whether you’re offering flat rates, live carrier rates, or local pickup, configuring it all can be surprisingly tricky.
In this post, we’ll walk through how WooCommerce handles shipping, common reasons options don’t appear, and how to fix them.
Why it matters: clear shipping options have real business benefits.
- Reduced cart abandonment: Offering multiple methods gives customers flexibility and lowers checkout drop-offs.
- Improved brand reputation: Transparent shipping builds trust and loyalty.
- More flexibility and control: WooCommerce lets you define zones, methods, and conditions for smooth fulfillment.
Also read: From Downtime to Prime Time: How WooCommerce Maintenance Services Keep You Online
Getting Started With Shipping in WooCommerce
Shipping is enabled by default, but you can change or disable it under WooCommerce > Settings > General. Under Shipping location(s), choose:
- Ship to all countries you sell to
- Ship to all countries
- Ship to specific countries only
- Disable shipping and shipping calculations
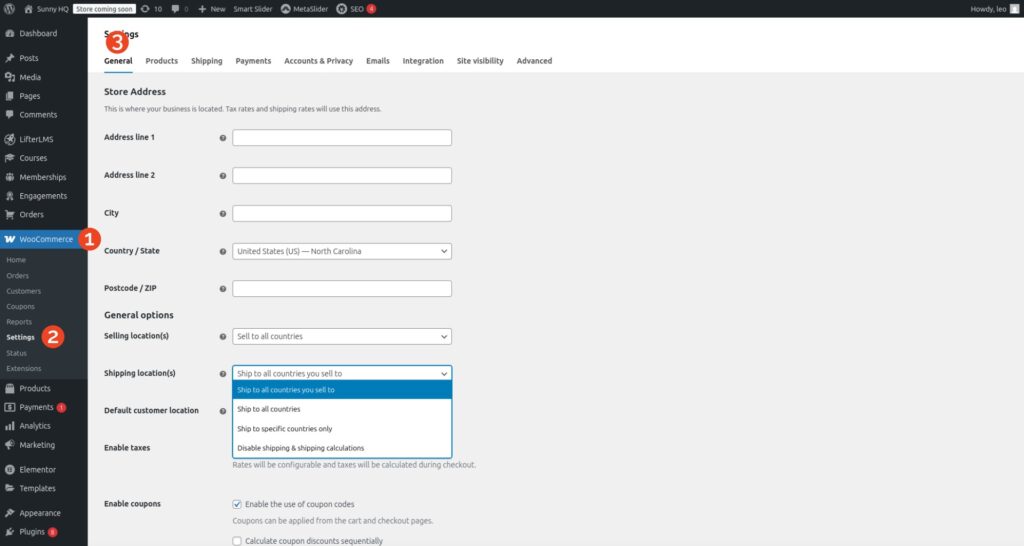
If unsure, use Ship to all countries you sell to. Then navigate to WooCommerce > Settings > Shipping. The four main tabs you’ll see are:
Shipping Zones | Shipping Settings | Classes | Local Pickup

1. Shipping Zones

Shipping zones define where you ship and how much it costs. Each zone can include one or more regions with assigned methods.
- Add zones (e.g., United States, Western Europe, California only)
- Assign shipping methods: Flat rate, Free shipping, Local pickup, or Live carrier rates
- Reorder zones — WooCommerce applies the first matching one
Example: Free shipping to the U.S., $10 flat rate to Canada, no shipping elsewhere.
2. Shipping Settings

This tab controls global shipping behavior. Enable debug mode for troubleshooting, or manage plugin-specific settings (for instance, from PluginHive or Flexible Shipping).
Note: The default tab is minimal until extended by a plugin.
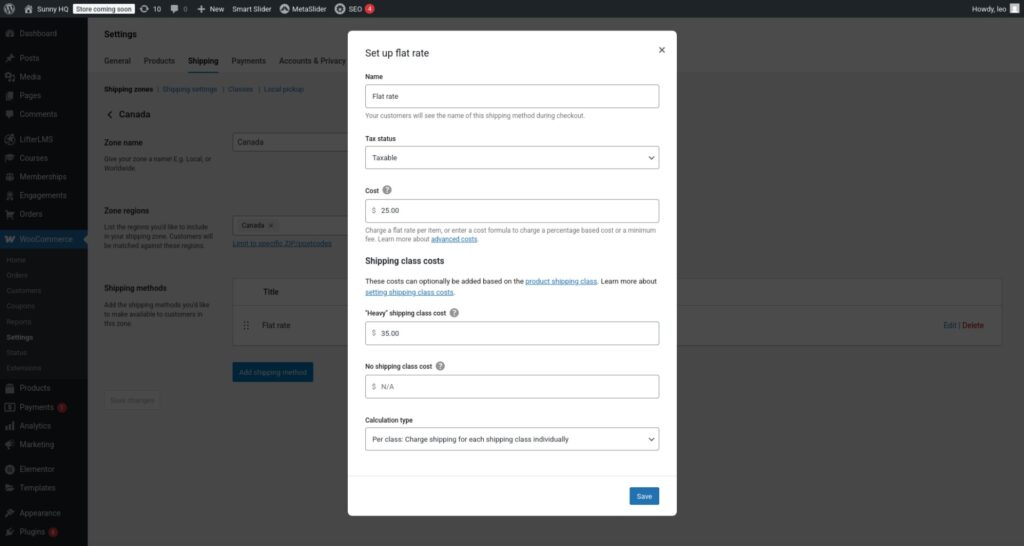
3. Shipping Classes

Shipping classes group similar products to assign special rates. Create classes like Heavy, Fragile, or Lightweight, assign them to products, and use them when defining Flat Rate pricing.
Example: Charge $20 for “Heavy” items and $5 for “Lightweight” within the same zone.
4. Local Pickup

Local Pickup has its own tab in WooCommerce 8+ for easier management. You can:
- Configure pickup locations globally
- Set tax status
- Rename the method (e.g., “Collect at warehouse”)
- Restrict to specific zones
Example: Offer free pickup near your store while charging shipping elsewhere.
Also read: WooCommerce for Beginners: Get Serious About Sales
How to Set Up Shipping Options in WooCommerce
Now that we’ve covered the essentials, let’s configure your shipping so options appear correctly at checkout.
Example: two zones — United States (Free Shipping) and Canada ($25 Flat Rate). You can further refine rates using Shipping Classes.
Assign products to a class in the Product Data › Shipping tab:

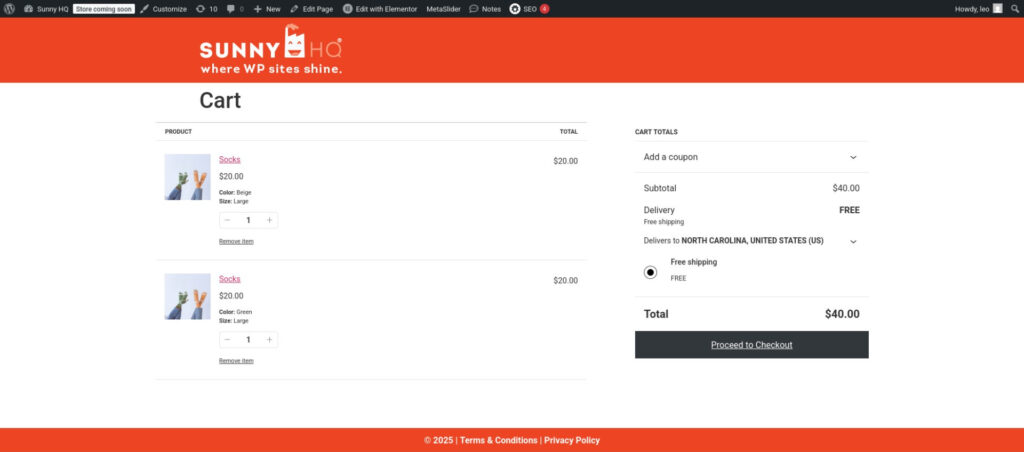
Shipping to the US
Free shipping applies to most products delivered within the U.S.
Shipping to Canada
Products sent to Canada incur the configured $25 rate.

Using the “Heavy” Shipping Class
Earlier we created a Heavy class. Here’s an example product using that rule:
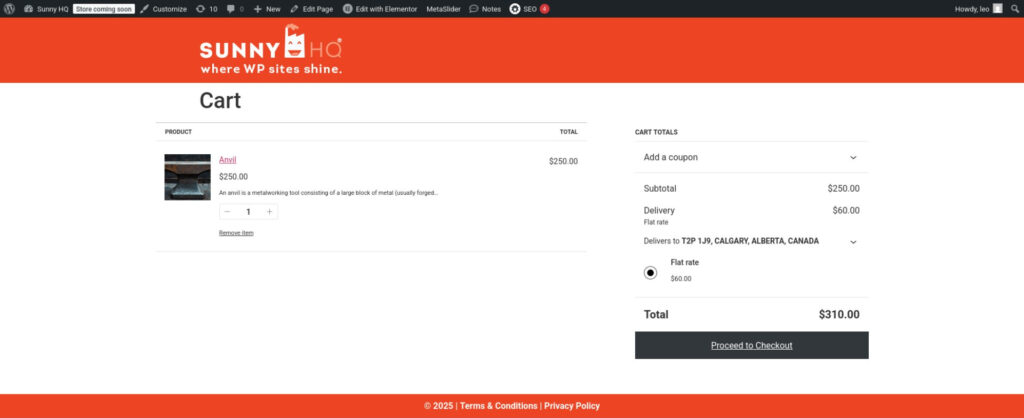
The checkout now applies the $60 rate (Flat + Heavy Class).
To handle U.S. heavy items, edit the U.S. zone › Flat Rate method › set $50 for the Heavy class.

When Multiple Methods Show
If both “Free Shipping” and “Heavy Rate” display, control visibility using the Conditional Shipping for WooCommerce plugin.

Create a ruleset such as US – Heavy › Condition: Product includes Anvil › Action: Disable Free Shipping (US). Save changes to apply.


Also read: Turbocharge Your WP-Admin – Essential Guide to a Faster WordPress Backend
How Customers Can Choose Their Own Shipping Method
To give buyers control over delivery speed, create multiple methods within a zone.
- WooCommerce › Settings › Shipping › Zones › Add or Edit Zone
- Add several Flat Rate methods (e.g., Normal, Fast, Overnight).


Shipping Plugins – When to Use One
Plugins extend WooCommerce shipping beyond basic features—ideal for automation, live rates, and conditional logic.
When to Use a Shipping Plugin
- Real-time carrier rates: Show live prices from UPS, FedEx, DHL, USPS.
- Conditional logic: Hide Free Shipping when heavy items exist, etc.
- Label printing & tracking: Integrate carriers to generate labels and notifications.
- International shipping: Handle zones, taxes, and customs forms automatically.
- Product-level rules: Different rates for books vs furniture using shipping classes.
Popular Shipping Plugins
- WooCommerce Shipping – Official plugin for USPS/DHL rates and label printing.
- Table Rate Shipping by Flexible Shipping – Custom rules based on weight, price, quantity, or location.
- Conditional Shipping for WooCommerce – Show/hide methods per product or cart rule.
- PluginHive Shipping Services – Automated rates, labels, and tracking for major carriers.
Choosing the right plugin streamlines fulfillment, reduces costs, and creates a better checkout experience.
In a Nutshell
Shipping is one of the most important—and often most frustrating—parts of running a WooCommerce store.
With the right zones, classes, and plugins, you can build a seamless checkout experience that boosts trust and conversions.
Sign up today and let Sunny HQ simplify your WooCommerce shipping so you can focus on growing your store.
WooCommerce Shipping FAQ
1. Why aren’t shipping options showing at checkout?
Usually because shipping is disabled or no zone matches the address.
Fix: Ensure zones and methods cover the customer’s location.
2. How do I offer free shipping over a certain amount?
WooCommerce › Settings › Shipping › Zones › Add Free Shipping method › Set condition to Minimum order amount.
3. Can I hide free shipping if a heavy product is in the cart?
Yes. Use the Conditional Shipping for WooCommerce plugin or custom code in functions.php.
4. Why are multiple methods displaying together?
WooCommerce shows all valid methods. Use Flexible or Table Rate Shipping to control priority or visibility.
5. Difference between zones, methods, and classes?
- Zones: Regions served (e.g., U.S., Europe)
- Methods: Shipping types assigned per zone
- Classes: Product groups for custom rates
6. How do I offer different rates for different products?
Create shipping classes (e.g., Books, Furniture, Heavy) and configure rates for each under Flat Rate.
7. “There are no shipping options available.” Why?
No enabled method matches the address or product class. Add a “Rest of the World” fallback zone.
8. Can I use live carrier rates?
Yes — with plugins like WooCommerce Shipping, PluginHive, or Flexible Shipping PRO.
9. Do I need to charge tax on shipping?
Usually yes. Configure under WooCommerce › Settings › Tax › Tax Options › Enable tax on shipping.
10. Can I offer Local Pickup only to nearby customers?
Yes. Restrict Local Pickup by zone or postcode using conditional shipping plugins.