Customers that register for an account on your WooCommerce store expect a confirmation email in their inbox almost instantly. This email is more than just a formality – it’s the first direct message your store sends, setting the tone for trust, professionalism, and your brand. But managing emails like this can feel confusing. Many store owners wonder whether WooCommerce is actually sending the email. Even more want to make changes that align with their respective brands. In this post, we’ll break down everything you need to know about confirming new account emails in WooCommerce – how they work, where to find them, how to edit them, and what to do if they don’t arrive.
Also read: How to Show Shipping Options in WooCommerce
What Is the New Account Email in WooCommerce?
WooCommerce includes a series of automatic system emails that are triggered by customer actions, such as placing an order, resetting a password, or registering a new account.
The “Customer New Account” email is one of these system-generated messages. It’s sent automatically when:
- A new customer registers through your checkout page
- A customer creates an account manually from the “My Account” page
- An administrator creates an account for a customer through the WordPress dashboard
This email typically contains:
- A welcome message confirming the account creation
- The customer’s username (and sometimes a password reset link)
- A login link to the “My Account” page of your store
It acts as both a confirmation and an onboarding message, letting customers know their account is ready and encouraging them to sign in.
Why Confirmation Emails Matter
It’s tempting to see the “Customer New Account” email as a simple receipt of registration, but in practice, it plays an important role in:
- Building trust: A quick, professional confirmation reassures customers that their account is active and their details are safe.
- Reducing support requests: Without confirmation, customers may wonder if their registration worked, leading to unnecessary inquiries.
- Encouraging engagement: This email is a great opportunity to provide next steps — such as browsing the store, managing account details, or signing up for your newsletter.
- Security: Some businesses use confirmation emails as a safeguard to ensure the account belongs to a valid email address.
For all these reasons, ensuring your new account emails are delivered, branded, and working properly is essential.
Also read: From Downtime to Prime Time: How WooCommerce Maintenance Services Keep You Online
Step 1: Confirm That New Account Emails Are Enabled
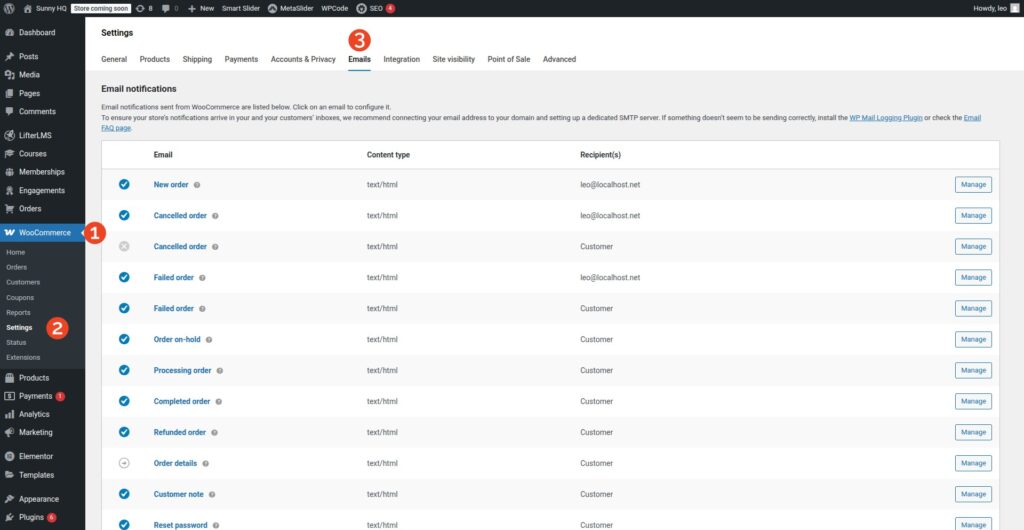
The first step is to make sure the email is active inside your WooCommerce settings. To check this:
- Log in to your WordPress dashboard.
- Navigate to WooCommerce > Settings > Emails.
- Scroll through the list of notification emails until you find ‘Customer new account’.
- Click Manage (or Configure, depending on your WooCommerce version).
- Check that the Enable this email notification box is ticked.
If it’s disabled, WooCommerce won’t send this email at all. Turning it on ensures that every new account registration triggers the confirmation email.
Step 2: Edit the Email Content
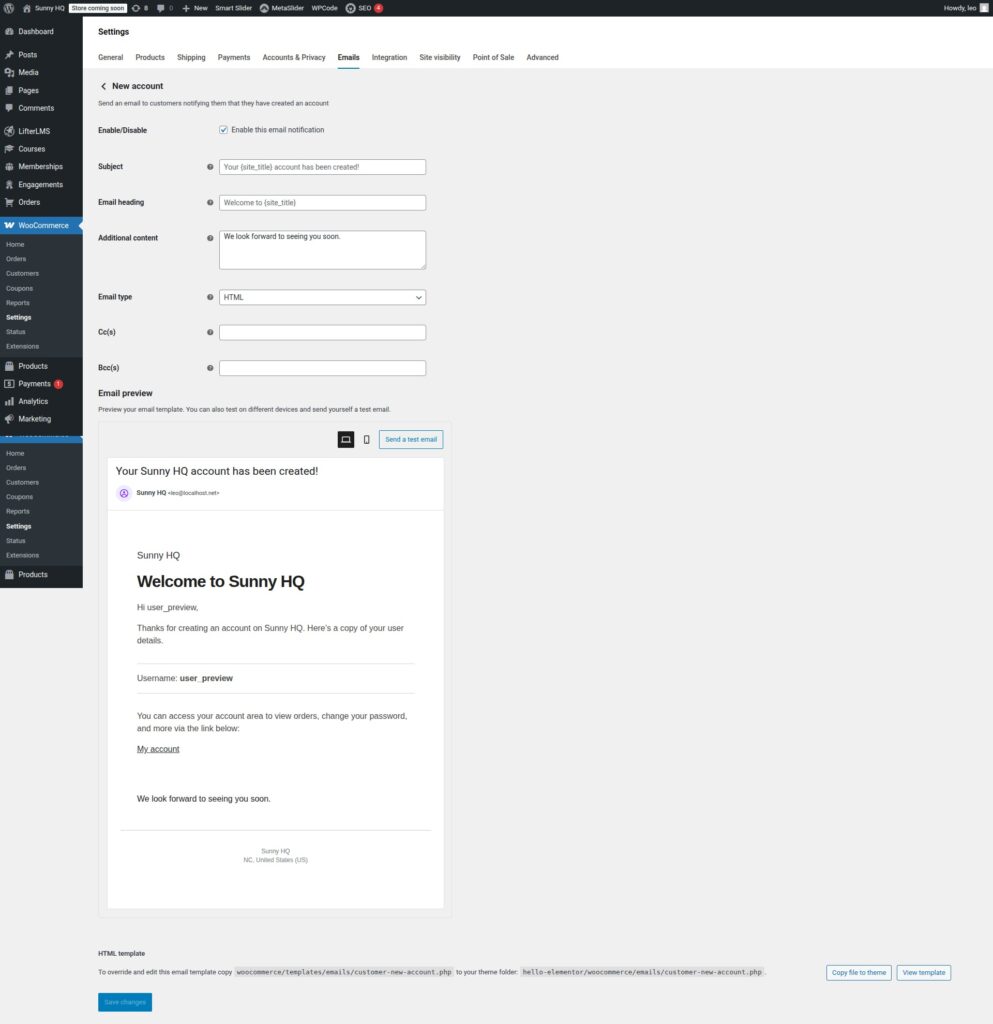
While WooCommerce provides a default template, many store owners choose to customize it to better reflect their brand and improve clarity for customers.
From the same Customer new account settings screen, you can edit:
- Subject line: For example, change “Your account has been created” to “Welcome to [Store Name] – Your Account Is Ready.”
- Email heading: This is the bold heading at the top of the email body.
- Additional content: A custom message that appears below the main text.
These small edits make the email sound more personal and aligned with your brand.
Step 3: Customize the Email Template
If you need deeper customization – such as changing the layout, adding your logo, or inserting custom text – WooCommerce allows you to override the default template.
Here’s how:
- Navigate to your WordPress theme folder.
- Inside, create a subfolder named /woocommerce/emails/ (if it doesn’t already exist).
Copy the file customer-new-account.php from:
/wp-content/plugins/woocommerce/templates/emails/
to:
/wp-content/themes/[your-child-theme]/woocommerce/emails/
Edit the copied file in your child theme. Any changes you make here will override the default WooCommerce email template.
Important: Always use a child theme for overrides. Editing plugin files directly means your changes will be lost when WooCommerce updates.
Step 4: Brand Your Emails With Plugins
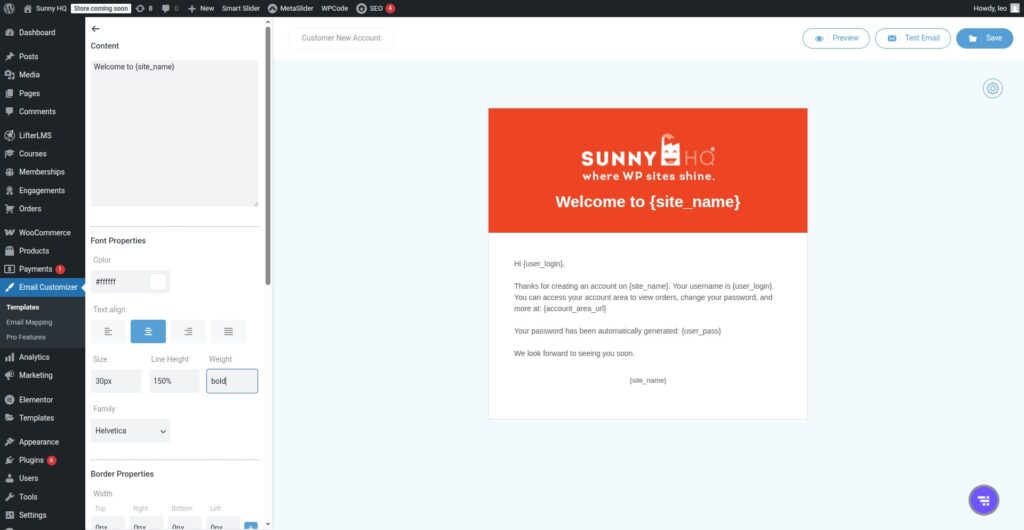
Not everyone wants to dig into PHP templates, and that’s where email customizer plugins come in. These tools provide a drag-and-drop editor for WooCommerce emails, making it easy to adjust fonts, colors, logos, and layouts without coding.
Some popular options include:
- Kadence WooCommerce Email Designer – Free and beginner-friendly.
- YayMail – WooCommerce Email Customizer – Visual builder with add-ons for advanced workflows.
- Email Customizer for WooCommerce by ThemeHigh – Includes template library and dynamic content.
These plugins save time and make it simple to match emails to your brand guidelines.
Step 5: Make Sure Emails Are Being Delivered
One of the most common frustrations is when WooCommerce says it sent the email, but the customer never receives it. This usually isn’t WooCommerce’s fault – it’s often due to how WordPress sends email.
By default, WordPress uses PHP’s mail() function, which is unreliable and often flagged as spam. To fix this, you should set up SMTP (Simple Mail Transfer Protocol) for your site.
How to set up SMTP:
- Install a plugin like WP Mail SMTP.
- Choose a mailer service such as Gmail, SendGrid, Amazon SES, or your web host’s SMTP server.
- Enter your authentication details into the plugin.
- Send a test email to verify it works.
With SMTP configured, your new account confirmation emails are far less likely to land in spam folders or fail altogether.
Step 6: Test Your Confirmation Emails
Never assume your changes are working – always test.
Here’s a quick checklist:
- Create a new customer account from the “My Account” page.
- Check the email inbox for the confirmation.
- Confirm the subject line, body, and links display correctly.
- If you’ve customized the template, check that it looks good across devices (desktop, mobile, tablet).
You can also use plugins like WP Mail Logging to keep track of all outgoing messages from your site, ensuring WooCommerce really did send them.
Troubleshooting Common Problems
1. Customers Aren’t Receiving Emails
- Check that Customer new account is enabled.
- Verify the site is sending emails (set up SMTP).
- Ask customers to check spam/junk folders.
2. The Email Looks Broken
- If you edited templates, double-check your code for errors.
- Switch back to the default WooCommerce template to isolate whether your edits caused the issue.
3. Customers Don’t See Password Reset Links
WooCommerce often sends a separate “set password” email. If you want the new account confirmation email to include a password reset link, you can customize the template or use a plugin to merge those steps.
4. Emails Going to Spam
- Authenticate your domain with SPF, DKIM, and DMARC records.
- Use a professional mailer (like SendGrid or Postmark) instead of relying on your web host.
Best Practices for Confirmation Emails
- Keep it clear: Avoid overwhelming the customer with too much text. The purpose is to confirm their account, not upsell.
- Add a CTA (Call to Action): Encourage customers to log in, browse products, or complete their profile.
- Use friendly language: A warm welcome sets a positive tone for your brand relationship.
- Maintain consistency: Fonts, colors, and logos should match your website.
- Test regularly: Even if things are working now, plugin or server updates can change behavior.
Advanced Customization Ideas
If you want to go beyond the basics, consider:
- Adding a coupon code: Welcome customers with a small discount on their first order
- Including product recommendations: Suggest popular categories or featured products
- Linking to support resources: Provide quick access to FAQs or customer service
- Personalization: Use the customer’s name or mention how they joined (e.g., “Thanks for signing up during our summer sale!”)
These touches can turn a routine system email into a customer engagement opportunity.
Wrapping Up
Confirming new account emails in WooCommerce doesn’t need to be complicated. At its core, the process is about making sure the Customer New Account email is enabled, customized, reliably delivered, and aligned with your brand.
By following the steps in this guide, you can:
- Confirm the email is active.
- Edit the subject line, content, and template.
- Customize the look with plugins.
- Ensure delivery with SMTP.
- Troubleshoot common issues.
When done right, this “small” email becomes a powerful tool for building customer trust and engagement from the very first interaction.
Sunny HQ’s WordPress management services make it easy to do anything with your WordPress website – including customizing WooCommerce emails. Choose your plan, sign up, and let us do the WordPress heavy lifting.


