Web cache is a copy of data temporarily stored for fast future access. It’s a useful mechanism that reduces the number of requests sent to your WordPress website’s server and the demand placed on the server’s resources. At the same time, it ensures speedy content delivery to your website visitors’ browsers.
Key Takeaways
- WordPress caching stores temporary copies of content to speed up delivery and reduce server load.
- There are multiple types of cache: site/page cache, browser cache, server cache, and proxy/CDN cache.
- Clearing cache fixes issues like outdated content, formatting errors, and plugin/theme update conflicts.
- You can clear cache manually in your browser or with WordPress caching plugins such as LiteSpeed Cache, W3 Total Cache, and WP Fastest Cache.
- Smart cache management improves performance, user experience, and SEO rankings.
So cache improves the user experience by cutting down load times. That also benefits SEO; faster content delivery can lead to improved rankings which, along with some other SEO best practices put in place, can attract more visitors.
Also read: Tips to Grow Your WordPress Blog in 2023
How Does WordPress Cache Work?
WordPress cache, just like normal web cache, is considered ‘page cache’ or ‘site cache’ (see below). It also falls under the more encompassing ‘server cache.’ Whichever of these you choose, the caching method remains the same:
Step 1: Request handling
Requests for data (e.g. page content) are compared against the cache. If elements of a specific page or the entire page reside in the server’s cache, it is sent back to the visitor’s browser, and the request is considered complete. If, however, the cached data is missing, incomplete, or corrupt, the server will compile or render the data.
Step 2: Create cache
Once the data has been compiled or rendered, it is assigned a unique identifier and stored on the server. This unique identifier will be used later on to access the cached data.
Different Types of Web Cache
But cache can also cause hiccups. There are several reasons why managing your site’s cache (or at least having the tools to do so) is necessary, all of which relate to performance, troubleshooting, and privacy. To fully understand why some of these issues occur, it’s necessary to understand the different types of web cache that can affect your WordPress website. Let’s take a look.
Site cache / Page cache
Site cache or page cache is stored on your website’s server when a page on your site is accessed for the first time. When a visitor returns to that site, elements from that site are loaded from the cache. As a WordPress website owner, you can specify how long content remains in the cache; static elements can have an expiry date set much further away, while dynamic elements should have an expiry date set much sooner. Site caching is ideal for sites that have a lot of static content.
Browser cache
A visitor’s browser will store HTML pages, CSS stylesheets, images, and other content. As with site caching, it speeds up the browsing process, delivering content to returning visitors’ screens faster than it did the first time around. The content of browser cache can be set to expire after a certain period, and is managed by the browser – either cleared away when the cache is full or after a set period.
Server cache
Server cache is an umbrella term for all caching occurring on the server and includes object caching (stored database queries) and opcode caching (stored precompiled PHP code). It is fully managed by the server. When a visitor requests a page from a website, the server scans the cache for a copy of the requested content. If there is a cached version, it’s returned to the visitor immediately. It’s one of the best ways to reduce server load caused by web traffic and improve a website’s performance.
Proxy cache
With proxy cache, website files and media are stored on neither the server nor the client machine, but on a proxy server. The website (also called the ‘origin server’) coordinates with the proxy server on what website data to store. As with other types of caching, a request for content results in the server checking whether a cached copy exists. If a copy does exist, it is served to the visitor; if not, the website is queried and a copy is stored. A proxy cache can also refer to a Content Delivery Network (CDN) cache.
So, what can go wrong? As it turns out, accessing cached versions of content can be problematic at times, which means you’ll have to clear your WordPress website cache. Let’s look at a few potential issues.
Also read: WordPress CDN: Choosing the Best Solution for Your Website
Why Would You Clear Your WordPress Website Cache?
Keep in mind that it’s not always necessary to clear the entire cache in one go. Some of the plugins we list below make it easy to clear the cache selectively – perfect when you’re hunting down the causes of website errors.
Loading and formatting issues
Corrupted or outdated cache files can cause websites to load incorrectly. For example, when you’re making changes to your site’s front end, some visitors may only see those changes when the cache is cleared.
Updating themes and plugins
Outdated cache files occur most frequently with theme and plugin updates. Old style sheets and HTML can cause display issues, while outdated OpCode can cause site errors on both the front and back ends.
Troubleshooting WordPress errors
With caching enabled, there’s always a risk that you may not see the most recent version of a page, which can make diagnosing and resolving the issue difficult.
Improving performance
Cache is like any other form of storage that slows down as it gets fuller. Clearing it helps restore performance, though most modern systems manage this automatically.
How to Clear Browser Cache in Chrome and Firefox
The process to clear your browser cache will vary slightly depending on your browser. Below we outline the process for Chrome and Firefox.
Clear your browser cache in Chrome
Clearing your browser cache in Chrome is pretty straightforward. Click on the Settings vertical ellipses to open Chrome’s settings menu, and then click on Clear Browsing Data. Alternatively, use the keyboard shortcut CTRL + SHIFT + DEL.
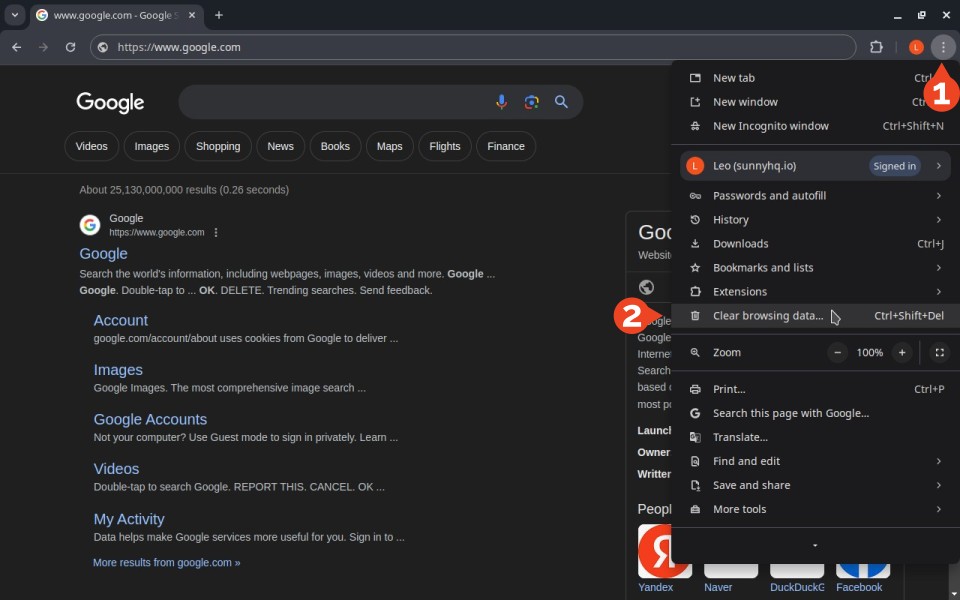
In most cases, the only option you’ll want to customize on the Clear browsing data window is the Time range. Given that some sites cache content for 30 days or longer, you’ll want to set the Time range to All time.
![]()
Clear your browser cache in Firefox
In Firefox the process is just as easy. Take a shortcut by pressing CTRL + SHIFT + DEL on a new tab, or get started by clicking the hamburger menu icon in the top right corner of the browser window.
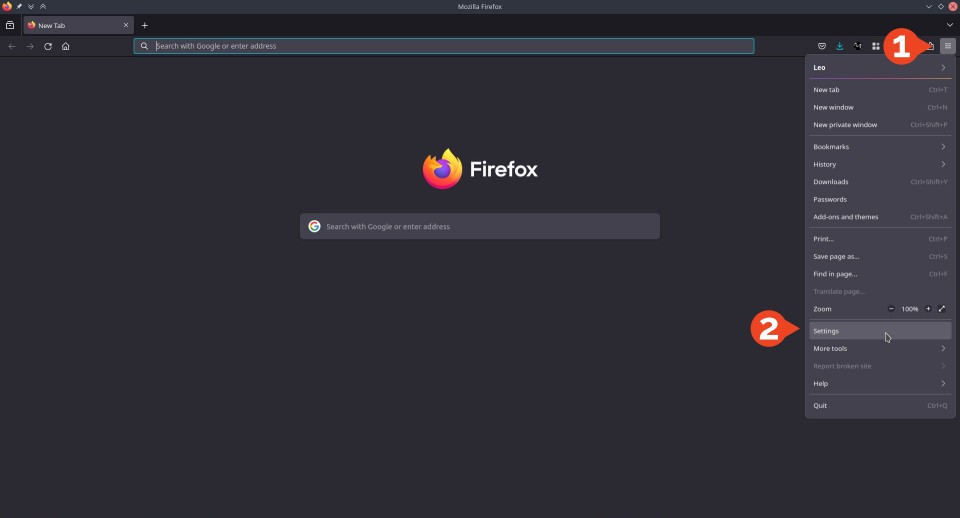
Navigate to Settings, then select Privacy & Security in the left-hand menu, and scroll down to Cookies and Site Data on the right. Click on Clear Data…
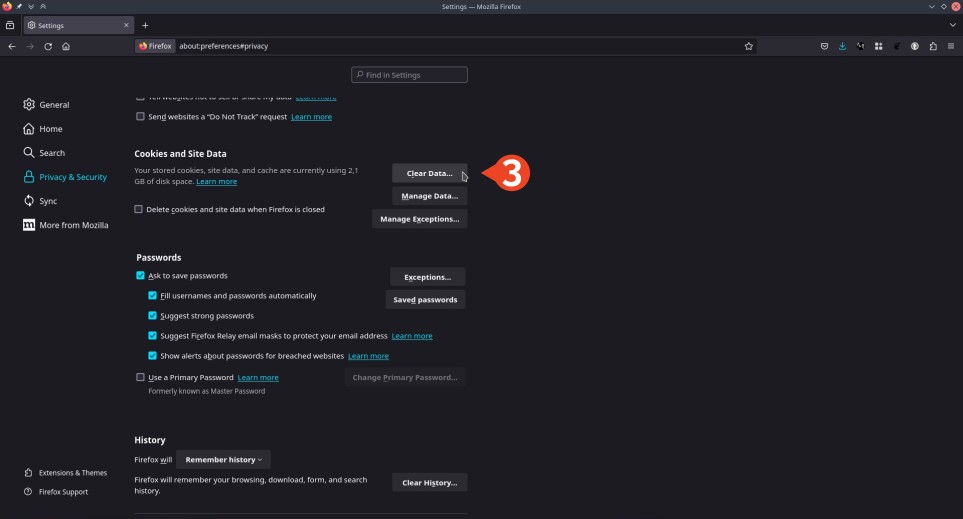
Click on Clear.
![]()
Free Plugins to Clear and Manage WordPress Cache
WordPress cache is page/site cache, which means it’s stored on the same server as your WordPress website. As with anything else in WordPress, there are various plugins that simplify cache management.
LiteSpeed Cache
Active installations: 5+ million
LiteSpeed Cache comes with a healthy set of features, all of which aim to add some serious speed to your WordPress site. Although some features only work with the LiteSpeed web server, many caching features will adapt to whichever web server you use. As far as caching and general optimization are concerned, LiteSpeed offers all the features you’ll need out of the box.

Clear the WordPress cache using the LiteSpeed plugin, follow these easy steps:
- From the WordPress Dashboard, navigate to LiteSpeed Cache > Toolbox in the admin panel.
![]()
- Here you’ll find various options for clearing the cache – from clearing the front page cache only to clearing the entire cache. If you don’t know which option to choose, use Purge All first. If that fails to resolve the issue, click on Empty Entire Cache (note, however, that until everything is cached again, it will increase the server load).
You can also carry out selective purges by category, post ID, tag, or URL.
W3 Total Cache
Active installations: 1+ million
W3 Total Cache is another feature-rich caching plugin with an optional setup wizard to help you configure the plugin to best match your WordPress site’s requirements. It hits the ground running by promising to improve your search engine performance, but then again, that’s true for any plugin that speeds up your page load times.
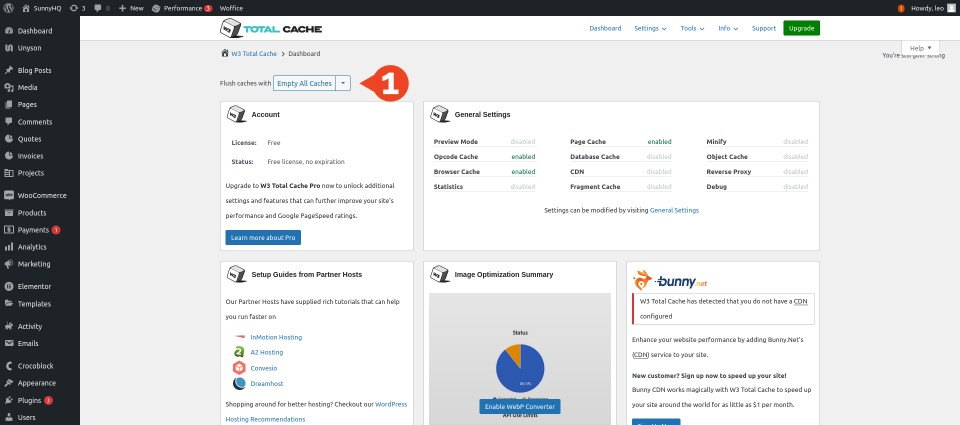
Clearing the cache with W3 total Cache is pretty straightforward. From the WordPress Dashboard, navigate to Performance > Dashboard. At the top of the page you’ll see a dropdown ‘Flush caches with’ with options for different caches you can clear: All Caches, Page Cache, or Opcode Cache. In most cases, either of the first two will do the job.
WP Fastest Cache
Active installations: 1+ million
WP Fastest Cache boasts the highest number of overall positive reviews on this list, which should say something. While some of its premium features (such as image optimization) are available for free in other plugins, it nevertheless focuses squarely on keeping things fast without too many unnecessary frills.

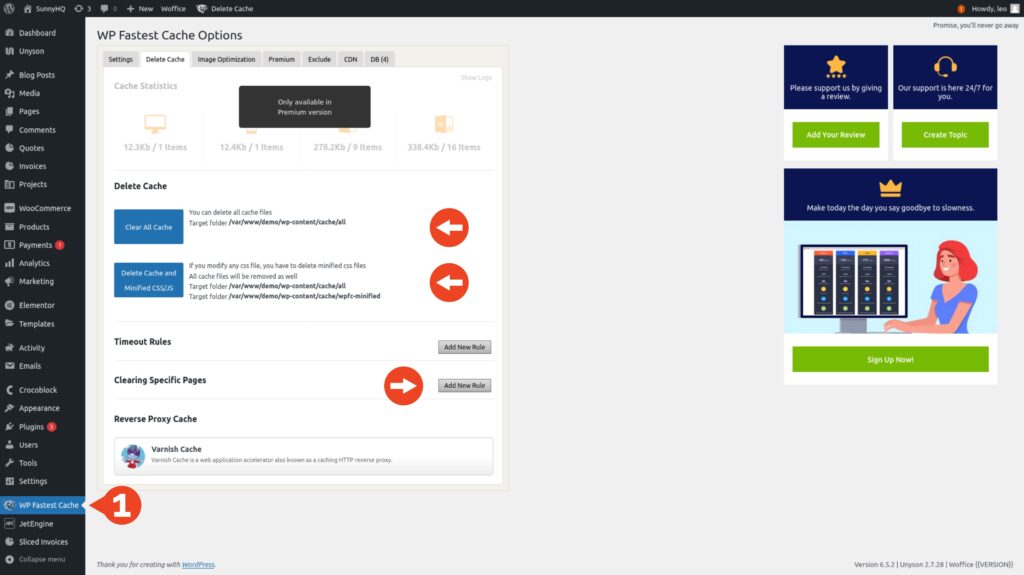
Clearing the WordPress cache with WP Fastest Cache is easy: From the WordPress Dashboard, navigate to WP Fastest Cache in the admin panel and then select the Delete Cache tab. With WP Fastest Cache you can choose to ‘Clear All Cache’ (recommended), ‘Delete Cache and Minified CSS/JS’ (the latter is sometimes necessary when making changes to CSS or javascript files or updating themes and plugins), or clear specific pages from the cache.
Also read: Turbocharge Your WP-Admin – Essential Guide to a Faster WordPress Backend
What to do next
Suppose flushing your site cache doesn’t cut it, and you regularly need help with theme and plugin updates, content updates, and troubleshooting issues before they become problems. Your next step should be to choose a Managed WordPress Hosting Care Plan or call us at (866) 258-8822.
FAQ: WordPress Clear Cache
What is caching in WordPress?
Caching in WordPress refers to temporary storage of HTML, text, images, and media to reduce server load and speed up content delivery.
Why should I clear my WordPress cache?
Clearing cache ensures users see the most updated version of your site, fixes errors, and prevents outdated files from breaking your site.
How do I clear the cache in WordPress?
You can clear cache with hosting tools or plugins like LiteSpeed Cache, W3 Total Cache, or WP Fastest Cache. You can also manually delete the contents of wp-content/cache.
Does clearing the WordPress cache affect performance?
Temporarily, yes—server load increases and pages may load slower until cache rebuilds. Performance stabilizes quickly afterward.
Is there a way to clear cache for specific pages?
Yes. Plugins like LiteSpeed Cache and WP Fastest Cache let you purge specific pages, posts, or categories.