
You’ve gone the distance to find a new home for your WordPress website. Mission accomplished. Moving in, however, is a different story. In this post we’ll show you how to successfully migrate your WordPress site to a new host. If this is your first attempt, fret not – for most websites it’s a short and simple process of creating a backup of your existing site, and restoring it on your new host’s server.
In this article |
|---|
| Things to consider before you migrate your WordPress website |
| How to migrate your WordPress site: Two methods |
| Final Steps |
Things to Consider Before You Migrate Your WordPress Website
WordPress website migration isn’t rocket science, but still requires a little planning so that the entire migration process occurs without losing traffic or information. Here’s what you need to do:
Ensure compatibility with the new host
One thing hosts seldom advertise – especially with shared hosting packages – is the list of supported software modules and technologies. And why would they? It’s technical information you seldom need.
But some themes, plugins, and custom code may have non-standard requirements to run efficiently. This is especially true for premium (paid-for) plugins and themes.
You can find the technical requirements of your plugins and themes on the developer’s website. Check with your new host that all requirements are supported.
Choose a migration method
Below you’ll find three different migration options, each with its own degree of difficulty. Choose the migration option that matches your skill level or the amount of time you have at your disposal:
-
Migration as a service
Many hosts offer a free migration service from your current host to their own servers. At SunnyHQ, for example, we’ll happily migrate your entire website to our servers, check compatibility, and test that everything works. No downtime or data loss, and it’s free.
-
Migrate using a plugin
Below we’ll outline the process of migrating your WordPress website between hosts using a plugin. In most cases it’s a pretty simple process. This option requires you to test your new site before changing your domain’s DNS records.
-
Migrate without a plugin
Also included below is the process for migrating your existing WordPress website to a new host within cPanel. No plugin required. This process involves uploading backups of your existing site and database to your new host. This option also requires testing of your new site before making any changes to your domain’s DNS records.
Schedule your migration / Communicate with your visitors
Migrating a website isn’t without risks to service availability. Ideally, you’d want to schedule your migration to occur outside peak hours. It’s also advisable to communicate the date and time of your scheduled migration with your visitors or site users so that they can be prepared for any possible service interruption.
How to Migrate Your WordPress Site: Two Methods
We’ve previously mentioned three methods that can be used to migrate your WordPress site. Since you can just sit back and relax when letting your new host take care of the migration, we’ll be covering migration with a plugin and migration without a plugin below.
| Important: Always test your website on the destination server before pointing your domain to your new host. |
How to migrate your WordPress website with a plugin
For this tutorial, we chose to use Migrate Guru since it not only provides 1-2-3 easy migration, but also provides other features that are otherwise tricky to implement, such as automatic search and replace on URLs.
Let’s get started.
| Important: Make a backup of your current WordPress website and database before you begin. |
-
Install Migrate Guru on your current WordPress website
Installing Migrate Guru is pretty straightforward. Head on over to your WordPress Dashboard on the website you want to migrate and then go to Plugins > Add New.
Search for Migrate Guru, then install and activate the plugin.

Once the plugin is activated, you’ll be redirected to Migrate Guru in the WordPress dashboard. (If you’re not redirected automatically, find and click on Migrate Guru in the admin menu of the dashboard).
-
Install Migrate Guru on your new WordPress site
Repeat the process in the previous step using a clean WordPress installation on your new hosting account.
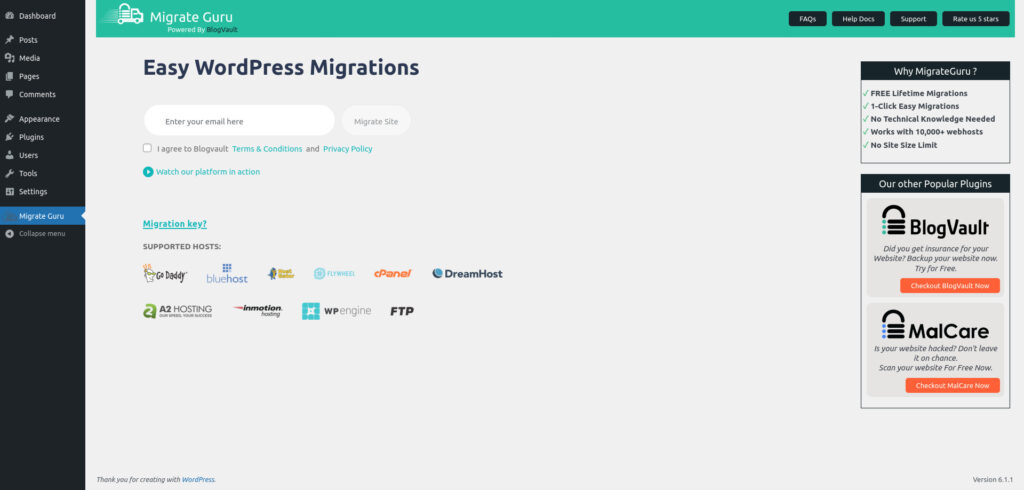
Once you’ve installed Migrate Guru, go to the Migrate Guru page in your WordPress dashboard and click on Migration Key? a little lower on the page. It will reveal a long migration key, which is easily copied by clicking on the copy icon to the right of the field. Paste the migration key into a text file.

-
Start the migration on your current WordPress site
Now that you’ve installed Migrate Guru on the destination site, go back to the Migrate Guru page on your current (source) WordPress site.
As you can see, Migrate Guru doesn’t come cluttered with hundreds of options. Instead, all you have to do to get started is enter your email address. Read the Terms and Privacy policy, and if all’s well check the box and click on Migrate Site.

One big plus is that all the migration work is done on the Migrate Guru servers, which makes sense, especially if you’re running a big site on an already strained server.
As such, the next page is loaded from the Migrate Guru server, asking you to choose your destination hosting service provider. Choose your new host. If your host isn’t listed, choose Other hosts in the bottom right corner.
For the purpose of this tutorial, we selected Other Hosts.

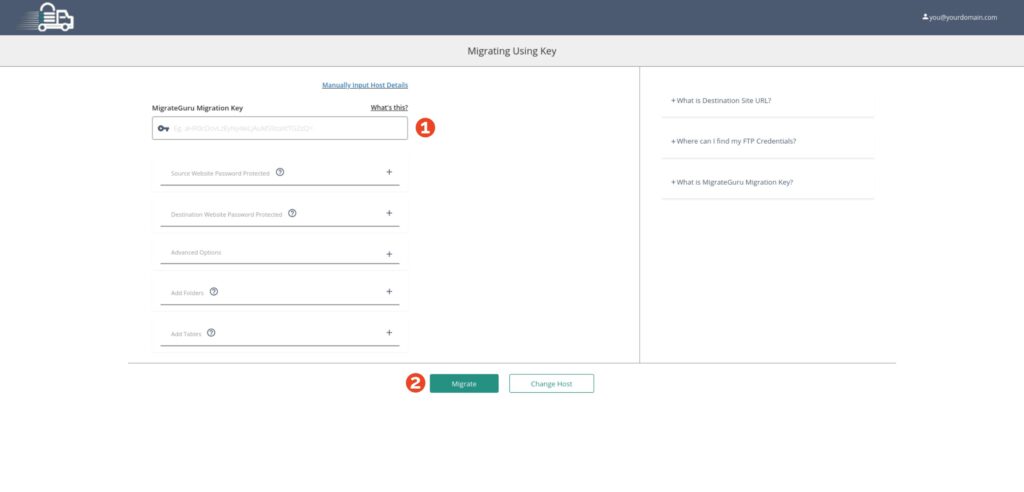
The next screen asks for the migration key you copied from the destination WordPress site in step 2 above. Copy and paste it into the MigrateGuru Migration Key field. Click Migrate.
Keep an eye on your inbox for Migrate Guru emails about the status of your migration.
Yes, it’s that easy.
How to migrate your WordPress website using cPanel
Migrating your existing WordPress website to a new host using a plugin is almost as convenient as getting your new host to do all the legwork. But there are a few instances where manual migration of a website may be preferable:
- Concerns about the security of an automated migration process.
- Website complexity requires manual migration of some files or database structures.
- You want more control over the migration process. If that’s you, then you can use the following steps to migrate your website to a new host. We’ll use cPanel to demonstrate the process on both a current site and a new destination site.
| Important: Some plugins and themes don’t migrate well, and may produce errors during either the export from your current site or the import to the destination site. If you experience any errors during the migration, check the documentation of the affected theme or plugin. |
-
Backup your site’s WordPress files
Log into your current site’s cPanel dashboard and navigate to the File Manager.

Once File Manager has opened, click to highlight public_html in the right-hand pane. Click Compress.

A popup window will appear. Here you can choose the compression type and specify a name and location for the compressed file. When you’re done, click on Compress Files.
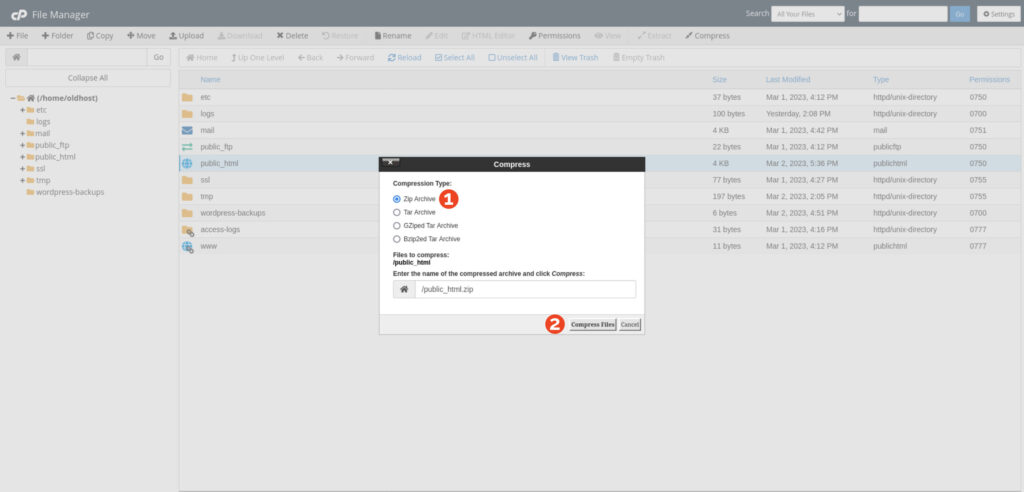
When the compression is complete, a Compression Results window appears. Click Close.

Click on the newly created archive, then click Download from the top horizontal menu.

-
Backup your WordPress site’s database
Close the File Manager and return to the cPanel dashboard. Under Databases you’ll find phpMyAdmin. Click on it. phpMyAdmin will open up in a new window.

In the left-hand pane of the phpMyAdmin window you’ll see a list of databases. Click on your WordPress website’s database.
(If you don’t know the name of your site’s database, find and open the compressed file you just downloaded. Look for wp-config.php and open it with a text editor like Notepad. Your site’s database name is next to DB_NAME.)
Next, click on Export in the top horizontal menu in the right-hand pane.

In most cases, you can leave all settings as is and click on Go to export and download your site’s database.

-
Import your site’s WordPress files
Now that you’ve exported your WordPress website and database from the current host, it’s time to import them at your new host. We’ll use cPanel again.
Open up the cPanel File Manager.
In most cases, your site’s files are served from the public_html folder. This means we’ll have to upload the compressed archive you downloaded earlier to public_html.
Click on public_html in the left-hand pane to display the folder contents in the right-hand pane, and then click Upload in the top horizontal menu. Select and upload your site’s compressed archive file.

Once the archive file has been uploaded, select it in the right-hand pane and click Extract in the top horizontal menu. A popup window will appear asking where the compressed files should be extracted to. Leave it on the default public_html and click Extract Files.

Chances are this will create another public_html folder inside the current public_html, which means we have to move all the WordPress files back into the main public_html folder.
Click on the first WordPress folder, hold shift, and then click on the last WordPress file.
| Note: Folders like cgi-bin can be ignored. We only want to move WordPress files and folders. |

Then click on Move in the top horizontal menu. A popup window will appear, asking the destination path. Remove the trailing public_html/ so that you’re only left with /public_html/. Click Move Files.

Click on the parent / main public_html folder in the left-hand pane. This should now display all your WordPress files. The imported public_html folder (right-hand pane) can now be deleted along with the imported zip file.
-
Import your WordPress site’s database
-
Create an empty database
Return to the cPanel dashboard. If you don’t have a database yet, open the MySQL Database Wizard. If you do have an empty MySQL database, skip to the next step ‘Import your WordPress database’.

In Step 1 of the wizard, enter the name of your database. Ideally you’d want to leave the database name unchanged. If you do, however, change the database name, you’ll have to change the name in your site’s wp_config.php too.

In Step 2 of the wizard you need to assign a username and password to the database. Again, leave these the same where possible. You can find them in your site’s wp_config.php. When you;re done, click Create User.

In Step 3 of the wizard you need to assign privileges to the database user. These privileges determine which actions the database user can perform. Check All privileges at the top of the privileges table. Click on Make Changes and then Next Step.

Step 4 provides confirmation that the database wizard is now complete.
-
Import your WordPress database
Return to the cPanel dashboard and open phpMyAdmin to import your WordPress database.
Locate and click on the name of the database you just created in the left-hand pane. Then click on import in the top horizontal menu.

Click on Browse to locate and select the exported .sql file containing your WordPress database. When you’re done, click Go at the bottom of the page.

If the import went well, you should receive a green success message just below the top menu. You’ll also see a list of tables below your database name in the left-hand pane.

| Remember: The database name and credentials in wp_config.php must match those of the database on your new host’s server. |
If your domain name’s DNS records have already been changed to point to your new host, you can now start testing your website.
However, if you’ll be testing your website under a temporary domain or URL, you’ll need to update your WordPress website and admin URLs to the temporary URL. To do this two database entries will have to be amended.
With your database name still selected in phpMyAdmin’s left-hand pane, click on SQL in the top horizontal menu.
Replace ‘www.your-test-url.com‘ in the SQL query below with your temporary URL:
UPDATE wp_options SET option_value = 'https://www.your-test-url.com' WHERE option_name IN ('siteurl', 'home');
Copy and paste the SQL query into the empty text area, and click Go.

If all went well, you should be able to log into the WordPress dashboard of your website on your new host’s server. When you’ve logged in, navigate to Settings > Permalinks in your WordPress dashboard and click Save Changes.

| Note: If your testing URL differs from your live site URL, some links may still point to your live URL, such as text links in posts. These will have to be updated by hand, or using a plugin like WP Engine’s Better Search Replace. |
Final Steps
You’ve migrated your website and tested every nook and cranny. All that’s left now is to change the temporary URL to your site’s domain, and then to point your domain’s DNS records to your new host’s servers.
- From the WordPress dashboard on your new host’s servers, go to Settings > General. Change the WordPress Address (URL) and Site Address (URL) to reflect your site’s web address.

Once you click Save Changes you won’t be able to access the site on your new host’s server until you’ve changed your domain’s DNS records to point to your new host’s server.

- Edit your domain’s DNS records to point to your new host’s server.
Using a plugin is the easiest of the two methods described above to migrate your WordPress site to a new host. Use the manual migration method when a migration plugin fails to do the job or when you have security concerns. Of course, both these methods pale in comparison to having your new host do all the heavy lifting for you.
At Sunny HQ, we know you prefer spending time on mission-critical tasks rather than trying to figure out why your MySQL database isn’t importing. All Sunny HQ WordPress management plans come with free migration and testing to help you hit the ground running. No downtime or data loss, and it’s free. Give us a call if you’d like to find out how we can make your WordPress site shine!