
WooCommerce comes with all the features needed for thriving eCommerce, including customer emails. These system emails handle everything from order confirmations to password resets. If you’ve been hunting through settings looking for a way to customize confirmation and other system emails, this guide is for you. We’ll walk step by step through exactly where these system emails live, how to customize them from the dashboard, and what to do if you need more advanced edits.
Also read: From Downtime to Prime Time: How WooCommerce Maintenance Services Keep You Online
How WooCommerce Emails Work
When a new user registers an account, for example, on your WooCommerce store – either at checkout or via the “My Account” page – WooCommerce automatically sends them a welcome email.
The default version of this email includes:
- A subject line confirming the account creation.
- The username the customer registered with.
- A link to log in.
- Sometimes, a link to set or reset a password.
Its purpose is to confirm the registration, reassure the customer that their details are secure, and provide a quick way to sign in. All other WooCommerce emails also serve a purpose:
| New order | A mail is dispatched to your customer when a new order is received. |
| Cancelled order | A mail is dispatched to your customer when an order’s status changes to ‘Cancelled’. |
| Failed order | When an order changes its status to failed, your customer receives:
A notification email with the order details |
| Order on hold | Your customer receives a notification when an order is placed on-hold from the Pending, Cancelled or Failed order status. |
| Processing order | This notification is sent to your customer after payment, and contains the order details. |
| Completed order | This email is dispatched when an order changes status to ‘Complete’ – usually when it has been shipped. |
| Refunded order | This email covers both full and partial refunds, and are dispatched to your customer when the order is refunded. |
| Order details | If your customers ever need invoice details or a payment link, send this directly from the Edit Order screen of the particular order. |
| Customer note | Notes marked ‘Note to Customer’ are delivered to the customer in a customer note email. |
| Reset password | These emails are dispatched when the customer resets their password. |
| New account | This email is delivered when a customer creates an account on the checkout or account pages. |
Why You Might Want to Edit WooCommerce Emails
Store owners usually want to customize system emails, for several reasons:
- Branding: The default WooCommerce email looks plain. You may want to add your logo, colors, or friendly wording.
- Clarity: Customers sometimes get confused if the email doesn’t mention what to do next.
- Marketing: The email is a chance to add a gentle nudge — for example, a link to your shop or a discount code.
- Troubleshooting: If customers aren’t receiving it, you’ll need to check whether the email is enabled and working.
Whatever the reason, the first step is knowing where to find it.
Also read: How to Get Notifications When a Form Is Submitted in WordPress
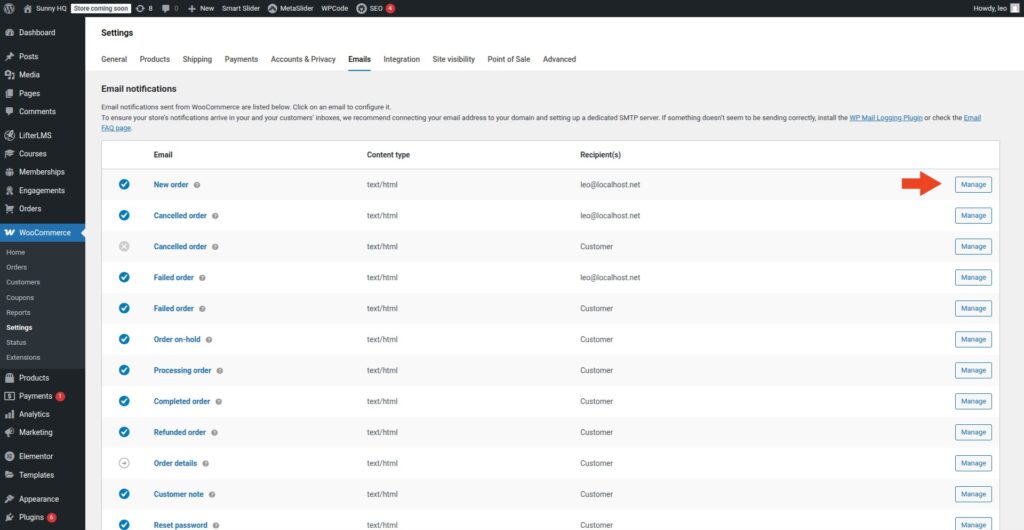
Step 1: Finding the Email in Your WooCommerce Dashboard
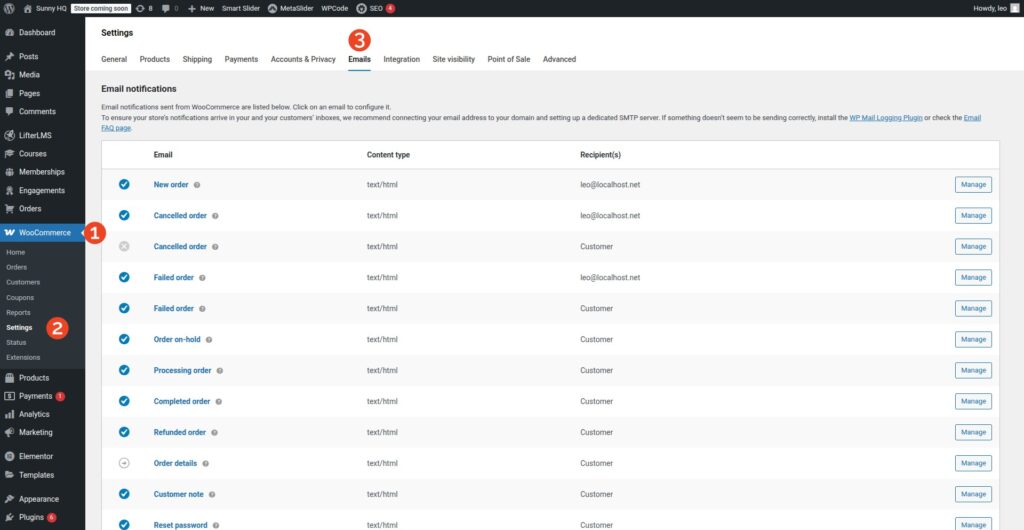
Here’s exactly where to locate the confirmation emails as well as other emails native to WooCommerce:
- Log in to your WordPress dashboard.
- Navigate to WooCommerce → Settings.
- Click on the Emails tab at the top of the page.
- Scroll down the list of email notifications.
- Look for the email you want to edit.
Click Manage (or Configure in newer versions) to open its settings.
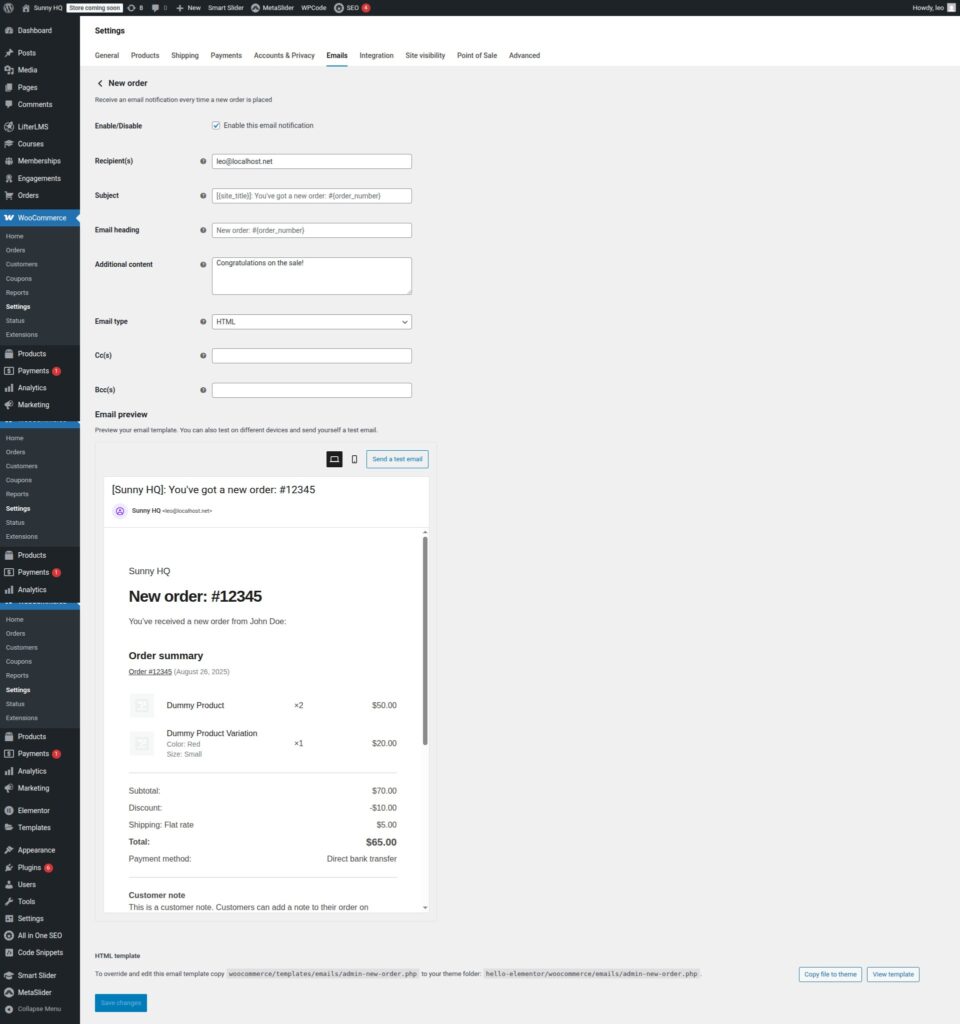
Step 2: Editing the Confirmation Email Settings
Once you’ve opened the email’s settings, you’ll see a screen that allows you to:
- Enable or disable the email entirely.
- Edit the subject line (for example: “Welcome to [Store Name] — Your Account Is Ready”).
- Edit the email heading (the bold text that appears at the top of the email).
- Add additional content (a short message that appears under the main body).
- Choose the email type: HTML, plain text, or multipart.
These options are enough for basic customization, such as adding your store’s tone of voice or clarifying instructions for the customer.
Step 3: Locating the Email Template Files
If you need deeper changes – like adjusting layout, adding new fields, or restructuring the message – you’ll need to edit the actual template file.
The template file for this email is called:
admin-new-order.php
You’ll find it inside the WooCommerce plugin folder:
/wp-content/plugins/woocommerce/templates/emails/
Important: Never edit files inside the plugin folder. Your changes will be overwritten when WooCommerce updates.
Instead, copy the file into your child theme:
/wp-content/themes/[your-child-theme]/woocommerce/emails/
Then make your edits there. WooCommerce will automatically use your theme’s version of the file instead of the plugin’s default.
Step 4: Using Plugins to Customize Without Code
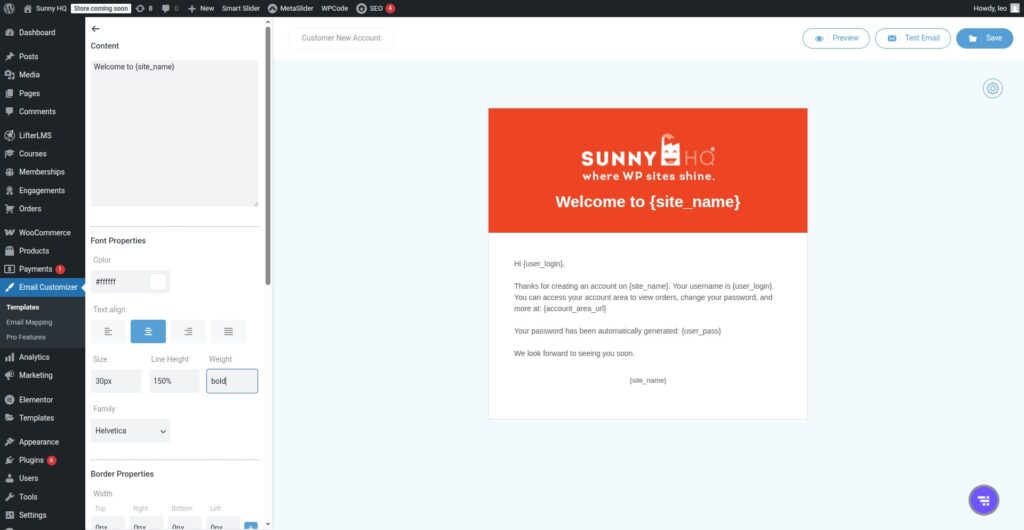
Editing template files isn’t for everyone. If you prefer a visual approach, several plugins allow you to customize WooCommerce emails using drag-and-drop editors.
Some popular choices include:
- Kadence WooCommerce Email Designer (free, user-friendly).
- YayMail WooCommerce Email Customizer (pro features and add-ons).
- Email Customizer for WooCommerce by ThemeHigh (library of pre-built templates).
These plugins let you:
- Add your logo.
- Adjust fonts and colors.
- Insert dynamic content (like the customer’s first name).
- Rearrange elements in the email.
For most store owners, this is the easiest way to achieve a professional, branded look without touching PHP.
Step 5: Troubleshooting Delivery Issues
Sometimes, the problem isn’t finding the email – it’s getting it delivered. If customers report that they never receive the confirmation, the issue is usually with email delivery rather than WooCommerce itself.
Here are the most common fixes:
- Enable the email: Double-check that email you are working on is turned on in settings.
- Use SMTP: By default, WordPress uses PHP mail(), which isn’t always reliable. Install a plugin like WP Mail SMTP and connect it to a real mailer service (Gmail, SendGrid, Postmark, etc.).
- Check spam folders: Ask customers to look in junk/spam. If your emails consistently land there, you may need to configure your domain’s SPF, DKIM, and DMARC records.
- Test with a different email address: Sometimes the issue is specific to certain providers (like Hotmail or Yahoo).
Also read: Unlocking WordPress – 5 Effective Methods to Reset WP Password
Wrapping Up
So, where do you find the confirm email in WooCommerce? All WooCommerce emails can be found at WooCommerce > Settings > Emails > Customer new account. Or, if you’re looking to make changes to the code, the email template can be found at /woocommerce/templates/emails/ or /wp-content/themes/[your-child-theme]/woocommerce/emails/.
From there, you can edit the subject, heading, and content right in the dashboard, or go deeper by overriding the template in your child theme. And if coding isn’t your thing, email customizer plugins provide a visual way to get the job done.
Finding and editing the confirmation email isn’t just about aesthetics. It’s about ensuring customers feel welcomed, supported, and confident in their decision to shop with you. With a few adjustments, this small but crucial email can reinforce trust and encourage customers to take the next step in their journey with your store.
Feeling out of your depth tinkering with WooCommerce emails? Sunny HQ extends your team’s technical skill set with expert WordPress knowledge that simplifies customizing WooCommerce emails, content changes, and general WordPress maintenance. Find out about our comprehensive WordPress Maintenance Service.