Customizing the WordPress login page is more than just a design choice. It enhances the user experience, strengthens branding, and adds polish to your site. Whether for eCommerce, membership sites, or intranets, a branded login page creates consistency and professionalism.
How to Customize Your WordPress Login Page – 2 Ways
The login page can be customized in two ways. The first is generally considered easier and uses a plugin.
This method is recommended if:
- You’re looking for a point-and-click solution
- You have no coding experience
- You don’t have any experience editing php files or stylesheets
The second method is manual customization of the WordPress login page. This method uses less code than a plugin which means less overhead, and potentially provides more control and flexibility. But, it does:
- Require some familiarity with code
- Require some experience editing the
functions.phpfile and your theme’s stylesheet
Let’s dive in!
How to customize your WordPress login page using a plugin
Plugins provide point-and-click functionality. If you’re a beginner with WordPress or if you don’t have the time to figure out how to add code to functions.php or style.css, the plugins below make it very easy to create a custom login page for your WordPress website.
How to choose a plugin
Not all plugins are created equal, and poorly coded or unmaintained plugins can pose serious security risks. Follow these guidelines to minimize your risk when selecting a plugin:
- Update Status: Ensure the plugin (or theme) has been updated within the last two months. Regular updates indicate active maintenance and compatibility with the latest WordPress version.
- Popularity: Popular plugins are generally better maintained and tested than obscure ones. However, this doesn’t mean you should avoid plugins with fewer installs—just approach them with additional caution.
- Plugin Size: More code often means more potential for security vulnerabilities. Identify the specific features you need and choose a plugin that aligns closely with those requirements, avoiding unnecessary bloat.
- Compatibility Check: Test any plugin for login page customization on a staging site before using it on your live site. Conflicts with other plugins or your theme can disrupt functionality or appearance. Temporarily disable other plugins to troubleshoot conflicts.
Also read: The Role of Professional WordPress Maintenance in Securing Agency Client Sites
LoginPress
Active Installations: 200,00+

LoginPress has the most active installations. It also has a high number of 5-star reviews and comparatively few 1-star reviews, which means it’s a worthy installation candidate.

After activation, a LoginPress menu item appears in the admin panel. Right off the bat, you can navigate to LoginPress > Settings which provides you with login management functionality, with features including:
- Force password reset: a handy feature for admins and site owners who want to ensure that users change their passwords after a specific number of days.
- Session Expire: Here you can force WordPress to log out users after a specific number of minutes have passed.
- Auto Remember Me: Keep the login page’s ‘Remember Me’ box checked.

Navigate to LoginPress > Customizer in the menu and you’ll be able to customize LoginPress’s own custom login page which became active the moment you activated the plugin. Click on ‘LoginPress’ in the side panel, and start customizing your login page using the many options available.
LoginPress comes with two pre-built login form themes and allows you to change virtually every aspect of the login form. It also supports custom backgrounds, background videos, transparency, and much more – that simply means more design freedom!

This is what we came up with using only the available options and two lines of custom CSS for the frosted glass effect of the login form:
#loginform {
background-color: rgba(255, 255, 255, .15);
-webkit-backdrop-filter: blur(5px);
backdrop-filter: blur(5px);
}
Custom Login Page Customizer
Active Installations: 90,000+

Custom Login Page Customizer markets itself as an excellent solution for creating a login page that aligns with your site’s branding.
It boasts a number of appealing features, including:
- A user-friendly interface that eliminates any need for coding or technical knowledge
- Easy customization of virtually every aspect of your website’s login page (logo, background, text, button styles, etc.)
- Responsive design which scales your login page and its various elements to display well on any device
- Multisite support makes it easy to customize the login page of each site in your network
Navigate to Login Customizer > Settings to adjust the plugin’s minimal settings. Here you’ll find an Auto Remember Me function that checks WordPress’s ‘Remember Me’ by default. You can also choose whether users should be able to log in using their usernames or email addresses. Unless your user base is somewhat technical, we suggest allowing both usernames and email addresses.

Next, navigate to Login Customizer > Customizer and then Login Customizer on the customization page.

Custom Login Page Customizer provides two free templates that you can use as a starting point for your customization. Given that we want to create a branded login page (which renders a prebuilt template needless), we’ll stick to the default WordPress login page.

As you can see, we managed to recreate the login page we created using the previous plugin. Although we did so with relative ease, we would say that Login Customizer is better suited to people who want a plugin light on features and design flexibility, or who’d simply like a plugin as a starting point followed by some custom CSS to get the job done.
Elementor Pro
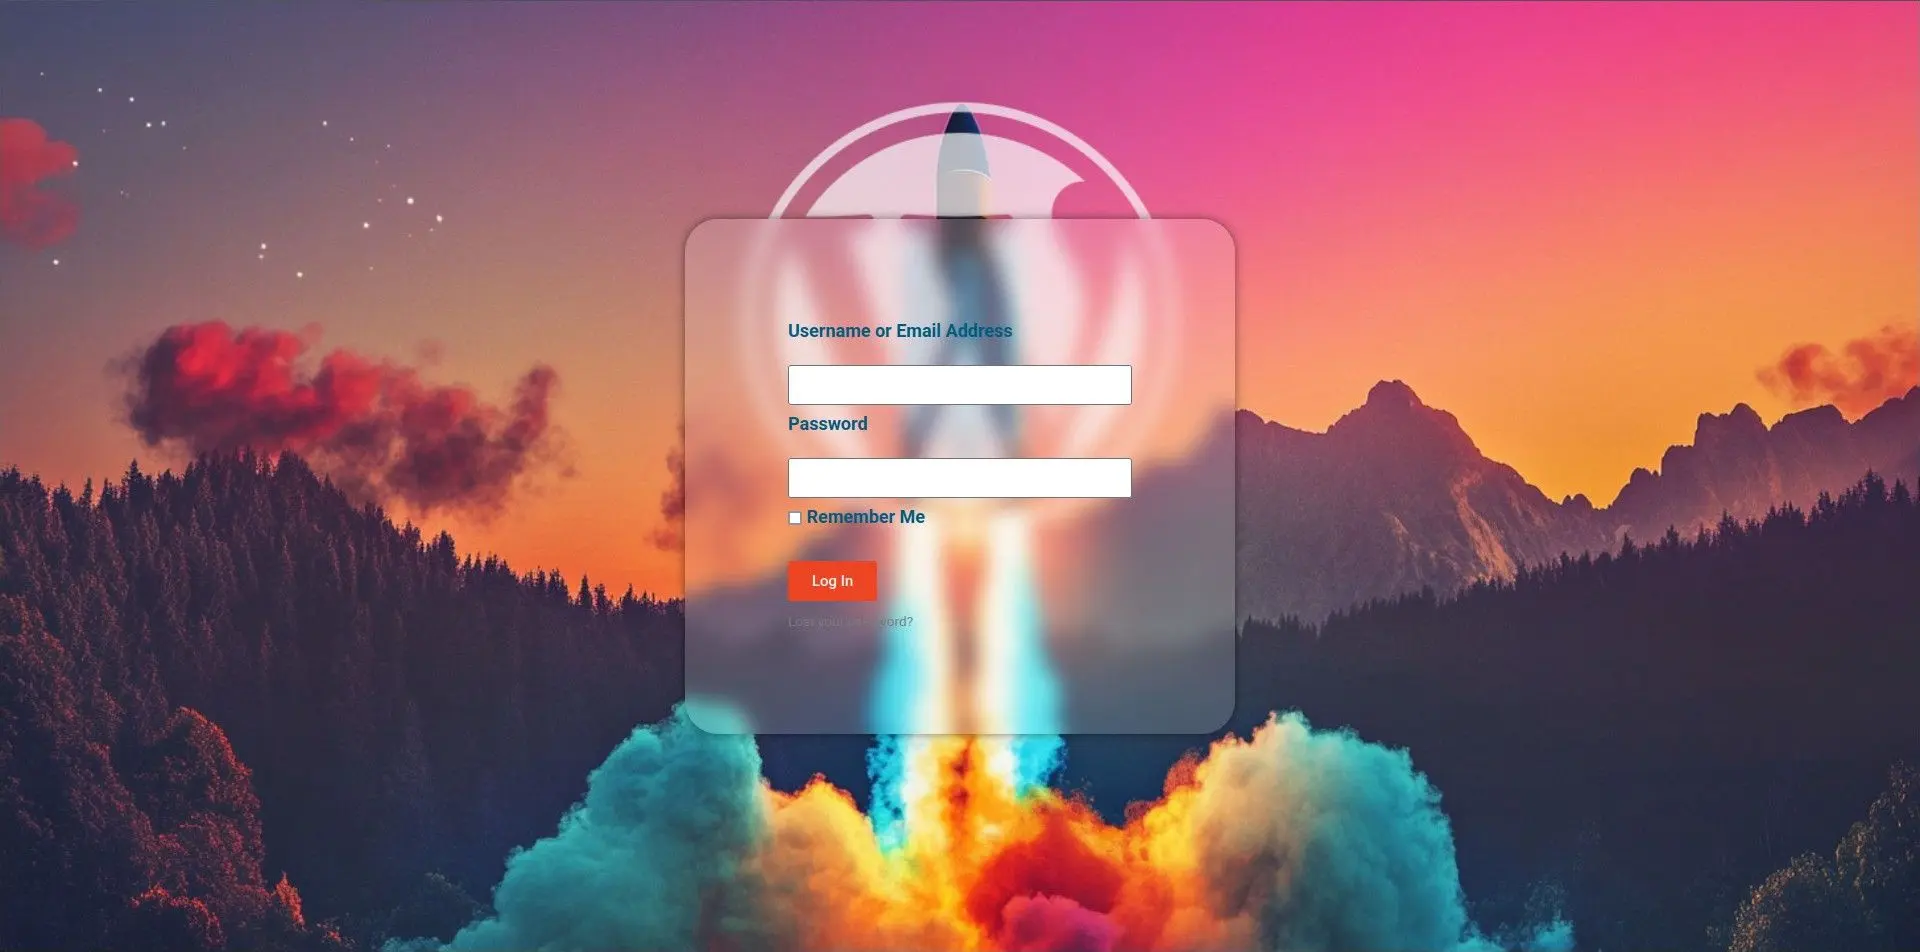
The previous two plugins we’ve used are each an easy way of customizing the WordPress login. But there’s so much more you can do with a login page – something perfectly demonstrated with a page builder plugin like Elementor Pro (no affiliation) which includes a Login widget.
Let’s take a look.

The image above is a screenshot of the custom login page created with Elementor Pro. It consists of a main container that contains two other containers stacked horizontally as columns:
- The left column contains the site logo, the login widget, and a text block
- The right column is set to stack elements vertically as rows and contains
- A heading widget in a container (for ‘Don’t have an account?…’)
- A container set to stack items horizontally as columns. This container contains another container set to stack items vertically. Inside the latter is a text widget (for ‘SPF’), a text widget (for ‘25’), a text widget for the package description, a divider, and so on.
- A container for the ‘View All’ button

Much like our other two plugins, Elementor’s login widget also provides us with a few options:
- Redirect after login – Specify which page a user should see after logging into your WordPress website. In most cases, this will be the account page.
- Redirect after logout – What do you want users to see once they’ve logged out?
- Lost your password – Show or hide the password recovery link
- Remember Me – Unlike the previous two plugins, this option simply allows you to choose whether or not ‘Remember Me’ should be displayed
- Logged in Message – A message telling logged-in users that… they are logged in.
- Custom Label – In case you want to change the labels of the username/email or password fields
Importantly, this is not just a login page – it takes into account that someone might not have an account, and presents them with a means to get one (along with awesome WordPress support!). If you have an eCommerce store, this could be where you display popular products, service notifications (e.g. ‘Deliveries delayed due to storms’), etc.
Finally, because we’ve customized the WordPress login, we’ll need to redirect unauthenticated visitors who try to access /wp-login or /wp-admin on our site.
The code below redirects unauthenticated users to our page called ‘login’. Paste it into your functions.php file.
Caution: Editing the functions.php file can break your site if there are syntax errors. Always use a staging environment or a plugin like Code Snippets to test your code safely. Ensure you have FTP access or hosting-level file management tools to recover from errors.
function custom_login_redirect() {
$login_page = home_url('/login'); // Custom login page URL
// Redirect unauthenticated users trying to access wp-login.php directly
if (strpos($_SERVER['REQUEST_URI'], 'wp-login.php') !== false && !is_user_logged_in()) {
// Allow WordPress to process login form submissions
if (isset($_POST['log']) && isset($_POST['pwd'])) {
return; // Let WordPress handle the login
}
// Redirect to the custom login page
wp_redirect($login_page);
exit;
}
// Redirect unauthenticated users trying to access /wp-admin
if (strpos($_SERVER['REQUEST_URI'], '/wp-admin') !== false && !is_user_logged_in()) {
wp_redirect($login_page);
exit;
}
}
add_action('init', 'custom_login_redirect');
Also read: Unlocking WordPress – 5 Effective Methods to Reset WP Password
How to Customize The WordPress Login From Scratch (no plugin)
Don’t want to add another plugin to your WordPress site? Keen on doing what you can by hand? Adding and customizing your login form to WordPress using some code is pretty straightforward. In this example, we’ll use the backend editor to create the login page, and then add some code to functions.php to create the basic form. We’ll also use some CSS to style our page.
Note: Because we’ll be making changes to some of your WordPress files, it’s best to create a backup of all your WordPress files and the database.
Step 1: Generate the shortcode
The code below generates a basic login form using a built-in WordPress function called wp_login_form(). Paste it into your functions.php file located in your theme directory.
function custom_login_form_with_errors_shortcode($atts) {
$atts = shortcode_atts(
array(
'redirect' => '',
),
$atts,
'login_form_with_errors'
);
// Define redirect URL: Use shortcode attribute or current `redirect_to` parameter
$redirect_url = !empty($atts['redirect'])
? $atts['redirect']
: (!empty($_GET['redirect_to']) ? esc_url($_GET['redirect_to']) : home_url('/dashboard'));
// Start output buffering
ob_start();
// Display login errors if they exist
if (isset($_GET['login']) && $_GET['login'] === 'failed') {
echo '<div class="login-error" style="color: red; margin-bottom: 15px;">';
echo 'Invalid username or password. Please try again.';
echo '</div>';
} elseif (isset($_GET['login']) && $_GET['login'] === 'empty') {
echo '<div class="login-error" style="color: red; margin-bottom: 15px;">';
echo 'Both fields are required. Please fill in your username and password.';
echo '</div>';
} elseif (isset($_GET['login']) && $_GET['login'] === 'false') {
echo '<div class="login-error" style="color: red; margin-bottom: 15px;">';
echo 'You must log in to access this page.';
echo '</div>';
}
// Define arguments for wp_login_form
$args = array(
'redirect' => !empty($atts['redirect']) ? $atts['redirect'] : home_url(),
);
// Display the login form
wp_login_form($args);
// Add optional registration and password reset links
echo '<p class="login-links">';
echo '<a href="' . esc_url(wp_registration_url()) . '">Register</a> | ';
echo '<a href="' . esc_url(wp_lostpassword_url()) . '">Forgot Password?</a>';
echo '</p>';
// Return the buffered content
return ob_get_clean();
}
add_shortcode('login_form', 'custom_login_form_with_errors_shortcode');
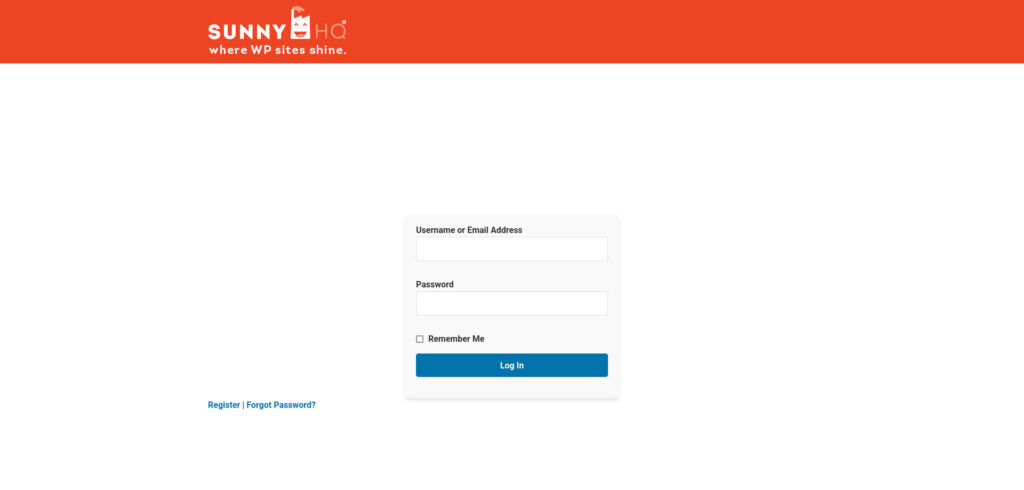
Step 2: Create a login page and paste the shortcode
The code in the previous step creates the [login_form] shortcode. But now we need somewhere to place the shortcode. Navigate to Pages > Add New Page and create a new page called ‘login’ (or whatever you choose to call it).
Paste the [login_form] shortcode on your page.
Step 3: Style your login form
Next, it’s time to add some CSS that’ll style the custom WordPress login form. Navigate to Appearance > Customize > Additional CSS and paste the code below, or add it to your theme’s style.css file:
/* Style the entire login form container */
#loginform {
max-width: 400px;
margin: 0 auto;
background: #f9f9f9;
padding: 20px;
border-radius: 8px;
box-shadow: 0 4px 6px rgba(0, 0, 0, 0.1);
}
/* Style the individual input fields */
#loginform input[type="text"],
#loginform input[type="password"] {
width: 100%;
padding: 10px;
margin-bottom: 15px;
border: 1px solid #ddd;
border-radius: 4px;
}
/* Style the submit button */
#loginform input[type="submit"] {
width: 100%;
padding: 10px;
background-color: #0073aa;
color: #fff;
border: none;
border-radius: 4px;
cursor: pointer;
font-size: 16px;
font-weight: bold;
}
/* Submit button hover effect */
#loginform input[type="submit"]:hover {
background-color: #005b8c;
}
/* Style the paragraph elements inside the form */
p.login-username label,
p.login-password label,
p.login-remember label {
font-weight: bold;
display: block;
margin-bottom: 5px;
}
/* Style the "Remember Me" checkbox */
p.login-remember input[type="checkbox"] {
margin-right: 5px;
}
/* Style for each paragraph container */
p.login-username,
p.login-password,
p.login-remember,
p.login-submit {
margin-bottom: 20px;
}
/* Style links for registration and password reset */
.login-links a {
color: #0073aa;
text-decoration: none;
font-weight: bold;
}
.login-links a:hover {
text-decoration: underline;
color: #005b8c;
}
/* Styling for error messages */
.login-error {
color: #d9534f; /* Red color for errors */
font-weight: bold;
background: #f2dede; /* Light red background */
padding: 10px;
border: 1px solid #ebccd1;
border-radius: 5px;
margin-bottom: 15px;
}
That’s it! If all goes well, you should have a page that looks something like this:
Use the shortcode in conjunction with your installed pagebuilder (if you’re using one) to create an effective and branded custom login page for your WordPress site.
Conclusion
Customizing the WordPress login can be done using a plugin, a page builder that comes bundled with a login widget, or custom code. It’s an easy way to enhance the branding and user experience of your site, and also gives you another bit of digital real estate to market popular products, services, or posts.
But, not everyone has the time or technical expertise to customize the WordPress login. Let Sunny HQ take care of your custom WordPress login, site or content changes, and WordPress website maintenance and security. Heck, even your WordPress hosting.