Images are a critical part of most websites. Unfortunately, images can also increase your page size and significantly slow your load times. This is frustrating to visitors and can lower your page ranking with search engines like Google. If a page doesn’t load in less than 3 seconds, most visitors will abandon your site and move on elsewhere.
Also, having a lot of images will use up more space on your server and increase your site’s bandwidth significantly. This is unlikely to be a problem in the early days of your website’s life; however, it could increase your hosting costs over time unless you are hosting with a company that does not charge for disk space or bandwidth like Sunny HQ.
The simple solution: optimize your images. Image optimization is just a fancy way of saying you should save your images in a web-friendly format. Image optimization is critical to making sure your site is performing at its best.
In this article, we’ll show you how you can optimize the images on your WordPress website to help your visitors have a hassle-free experience and make sure your site isn’t penalized by search engines for having slow load times.
| Key Takeaways |
|---|
| ✔ Use next-gen formats like WebP or AVIF where possible. |
| ✔ Compress images with lossy/lossless techniques to reduce file size. |
| ✔ Resize to fit display slots — don’t upload 4000px photos for 800px spaces. |
| ✔ Serve images via a CDN for faster delivery worldwide. |
| ✔ Enable lazy loading so offscreen images only load when needed. |
| Quick Reference |
|---|
| Hero image target: ≤150KB |
| Inline/thumbnail target: ≤80KB |
| Dimensions rule: Upload images at display size (e.g. 1400px max for hero), not raw 4000px files. |
| Formats: WebP/AVIF preferred; JPEG for photos; PNG for illustrations/icons. |
File Format JPEG or PNG – Optimize Images for WordPress
Graphic applications allow you to save images in many different file formats. The best formats for websites are JPEG and PNG.
Use a JPEG for photographs as they have a high color count. This format uses special compression to reduce file size while not affecting the clarity of the image. Use PNGs for images such as screenshots, illustrations, and website design images like icons and buttons. It uses a lossless compression technique to maintain a high-quality image. Steer clear of using PNGs for photos as it will result in a huge file size.

The other format that you’ll see used quite a lot is GIF. GIFs are well suited for lower-quality images with just a few colors. The GIF format is widely used on the internet for small, simple animations.
Size Your Images Correctly Before Uploading
Before we get to the optimization process, make sure you size your images before you upload them. With the proliferation of digital cameras and smartphones, photo sizes are pretty huge today.
Example: an iPhone 11 takes a 12-megapixel image, roughly 4,000 pixels by 3,000 pixels. Most desktop displays are around 1,680 pixels by 1,050 pixels (yes, there are bigger screens, but hold your horses.) Best practice for website design uses optimal widths of about 1,400 pixels. So if you upload images that are 4,000 pixels wide, you are already starting with an image nearly 300% of what you need.

Wanna geek out on image sizes and pixels? Read more here.
You can let WordPress do this as described below or use an application to do it beforehand. To keep it simple, I resize nearly all images to the largest size the site needs. You can do this by measuring the width of your site. In the above example, I would resize the images to 1,400px by 1,050px. I have optimized hundreds of websites by only resizing the images, which resulted in an average reduction in size of 400%. This is an essential step to optimize your WordPress site.
JPEG or PNG What is Better?
There are two schools of thought regarding when to optimize your images – before you upload them to WordPress or after. While there may be some circumstances when one is better than the other, in general, either is fine. You can even choose a hybrid method if you already have many images on your site to optimize, then moving to the “before” method for all new images. To optimize images before you upload, you will need Adobe Photoshop or the like (discussed below.) If you plan to do all the optimization after uploading, some great plugins will do this for you.
Optimizing Your Images Before Uploading To Your Website
WordPress has a neat thumbnail feature that automatically creates three different sizes of any image you upload. You can find this feature in the WordPress admin area under settings/media. Keep in mind that this does NOT optimize the image; it only changes the pixel dimensions.
You can adjust the thumbnail sizes as you see fit. For example, you can configure WordPress to create a thumbnail 150×150 pixel image, a medium 300×200 pixel image, and a large 600×600 pixel image. More than likely, this was set correctly by your developer, but make sure you review the settings.
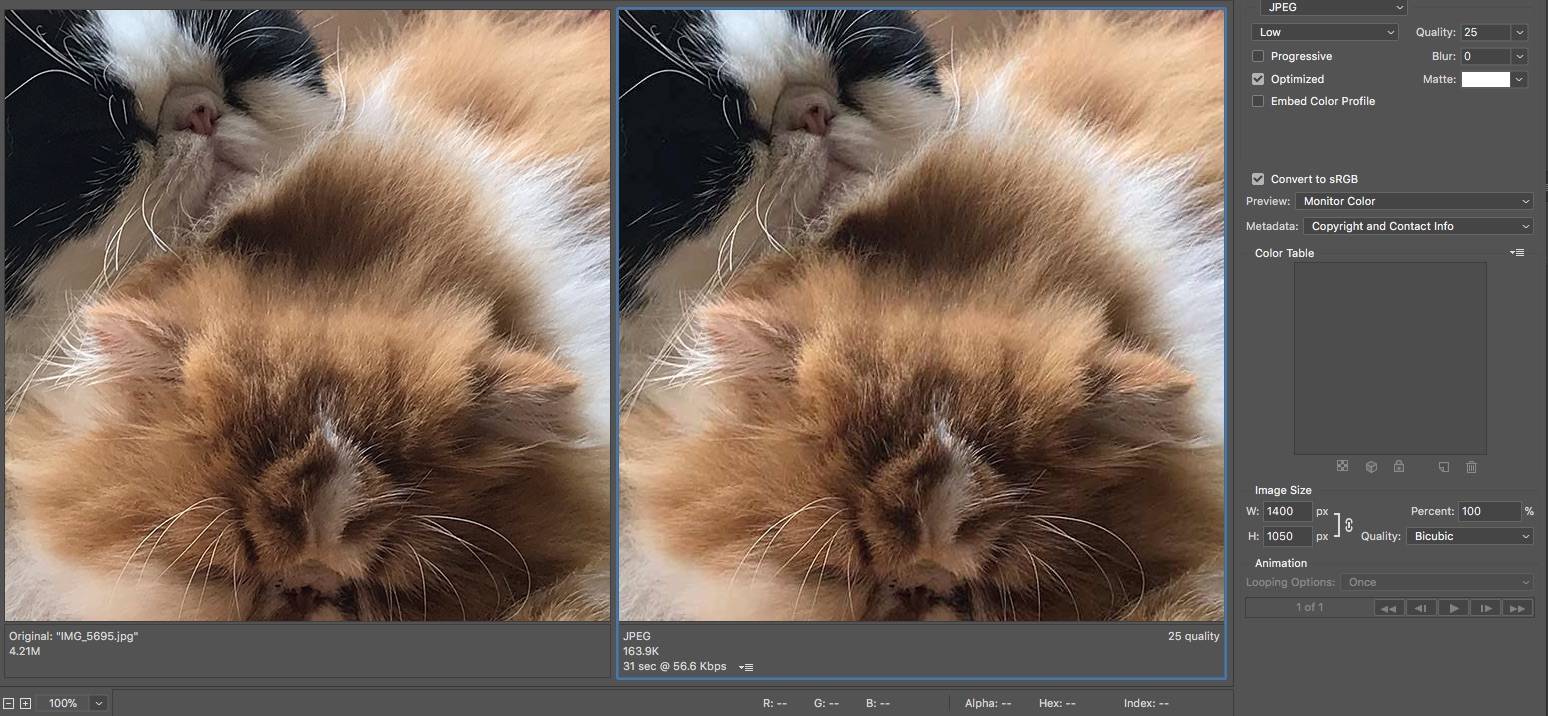
Most graphical editing applications allow you to adjust the quality of an image for use on the web. In Photoshop, the option is called “Save for Web and Devices.”
Photoshop allows you to choose the file type and quality of the image. At the bottom left side of the interface, you can see the details of the image file size with your chosen settings.
There are many great graphic editing applications available for optimizing WordPress images. GIMP is a good start. I also recommend checking out these:
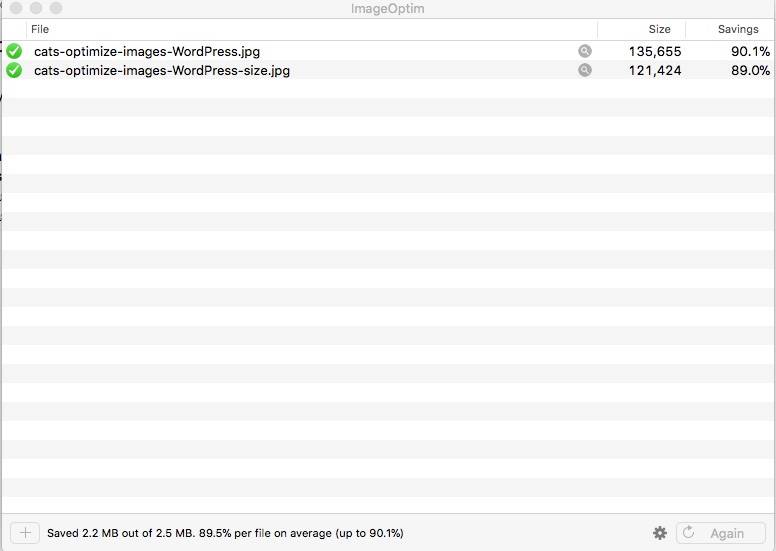
- ImageOptim (MAC) – Super simple to use and allows you to optimize tons of images all at once, including group renaming.
- Image Compressor (Web-based – works on any OS)
All of the above are free to download and use. While many premium applications are available for a fee, I don’t see any real advantages to using them over these free alternatives.
Optimizing Your Images After Uploading To Your Website
There are lots of plugins available that optimize images in WordPress after they’ve been uploaded to your site. With well over two million downloads, one of the more popular optimization plugins for WordPress is WP Smush.it. This plugin allows you to strip metadata from JPEGs, optimize the compression, convert GIF files to PNG and remove unused images. It’s also compatible with many of the more popular media library plugins, such as:
Alternatives to WP Smush.it include:
- EWWW Image Optimizer – One of my favorites!
- CW Image Optimizer
- Imsanity
- Hammy
Final Thoughts on Optimizing Images
To restate the obvious, optimizing your WordPress images is super important. Optimizing your images can reduce your site’s page load times – improving your visitors’ browsing experience and, in the process, help improve your page rankings with Google and other search engines.
Optimization is not just about speed. Choosing the right format (JPEG, PNG, WebP, AVIF), compressing correctly, resizing images to display dimensions, and serving them through a CDN with lazy loading will also reduce bandwidth, storage, and hosting costs. It’s one of the easiest wins for performance, SEO, and user experience.
If you’re unsure where to start, begin with resizing and compression. Then, add plugins to automate conversion to next-gen formats and configure lazy loading. And don’t forget to clear cache after changes to ensure new assets are served properly.
Still not sure? Need a helping hand that’ll take care of imagine optimization so that your site loads blazing fast? Sign up for Sunny HQ’s WordPress management so that you’ll always have a team ready to help keep your entire site optimized and performant.
| Definitions |
|---|
| WebP/AVIF: Next-gen image formats that deliver high quality at smaller file sizes than JPEG/PNG. |
| DPR (Device Pixel Ratio): Ratio of physical pixels to CSS pixels. High-DPR screens need higher-res images. |
| srcset/sizes: HTML attributes that serve responsive images depending on device and viewport. |
| LCP (Largest Contentful Paint): Core Web Vitals metric measuring how quickly the largest visual element (often a hero image) loads. |
WordPress Image Optimization FAQ
WebP vs JPG — when should I use each?
WebP (and AVIF) should be your default choice, as they provide smaller file sizes with equal or better quality. JPG is still useful for legacy browsers, email embeds, or cases where you need maximum compatibility. Many plugins automatically serve WebP with JPG fallbacks.
What are the best dimensions for a blog hero image?
A good rule of thumb: 1200–1400px wide is ideal for full-width blog hero images. Height is flexible depending on your theme, but aim for ≤150KB file size. Don’t upload 4000px photos unless your design requires ultra-high resolution.